FCMを使ってAPNs通知してみた!
こんにちは。i-Vinci 西村です。
個人的に触ってみたいと思っていた、APNs通知をやってみたいと思います!
今回は通知を受信するアプリのみ、実装してみます。通知メッセージを送信するバックエンドは、FCM(Firebase Cloud Messaging)で提供されているデバッグ用GUIを使用することとします。
では、はじめて参りましょう!
※前提
- 使用PC : Mac
目次
1. そもそもAPNsとは?
APNs(Apple Push Notification Service)とはApple社が作成したサービスで、
Push技術を使いアップルの端末に通知を転送することを可能とします。
バッジや、音、カスタムテキストアラートなど、通知内容をカスタムすることも可能です。
2. 今回やりたいこと
Googleが提供するFirebase Cloud Messaging(FCM)というクロスプラットフォーム メッセージング ソリューションを使用して、実機に通知をしてみたいと思います。(simulatorで通知のテストは出来ないようです。)クロスプラットフォームなので、 AndroidやWebにも対応しているそうですが、今回はiOSデバイスに通知してみます。
2-1. 通知の流れ
ざっくりと、一連の通知の流れは以下の通りです。
公式ページより以下画像を引用させて頂きます。
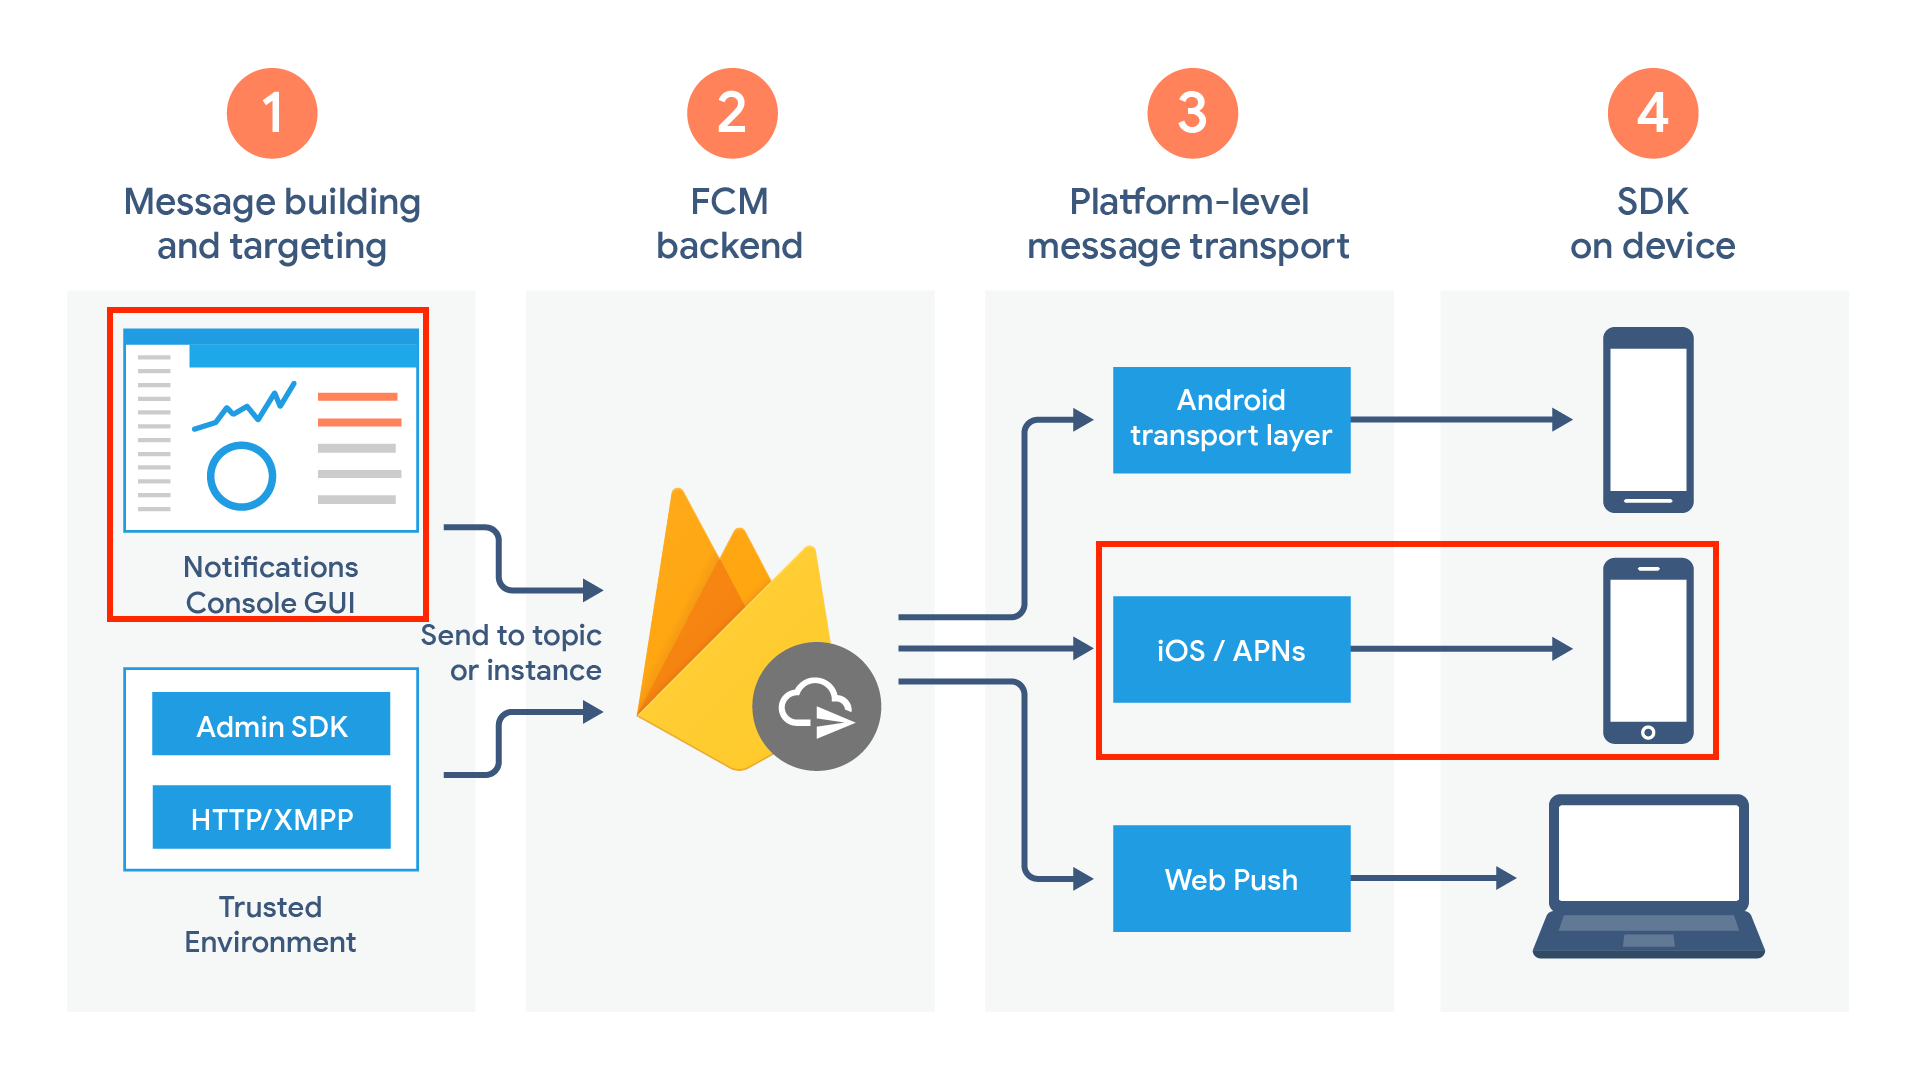
参考:Firebase公式ページ
URL:https://firebase.google.com/docs/cloud-messaging/fcm-architecture?hl=ja
①Firebase GUIよりメッセージを作成する
②FCM backendがAPNsへメッセージを送る
③APNsがメッセージを受信し、対象デバイスへ通知を送信する
④デバイスが通知を受信する
3. 事前準備
3-1. Apple Developer Programに登録する
Xcodeにて通知機能を有効にするには、Apple Developer Programに登録する必要があります。
お金が掛かるのでご了承の上、公式ページの流れに従って登録して下さい。
【Apple公式】Apple Developer Program
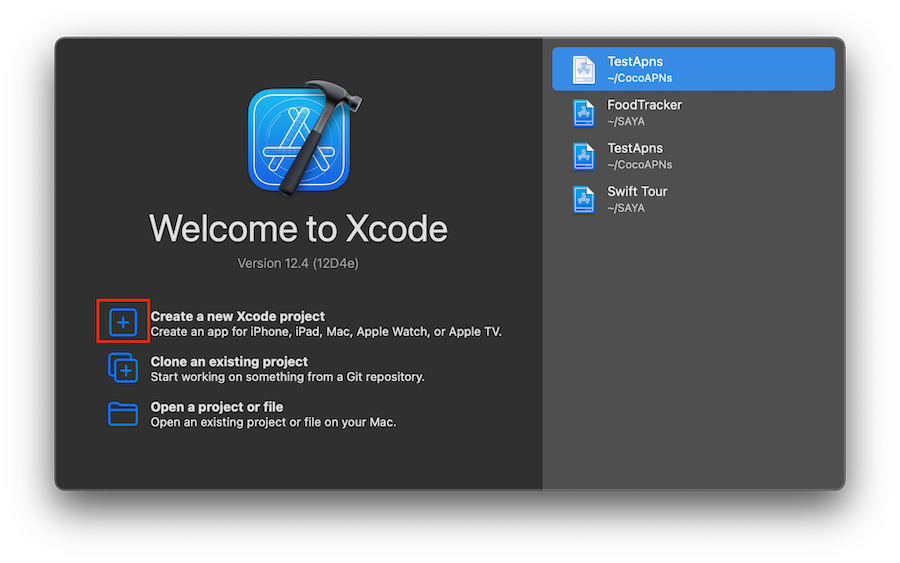
3-2. Xcodeでプロジェクトを作成する
①「Create a new Xcode project」を選択する。
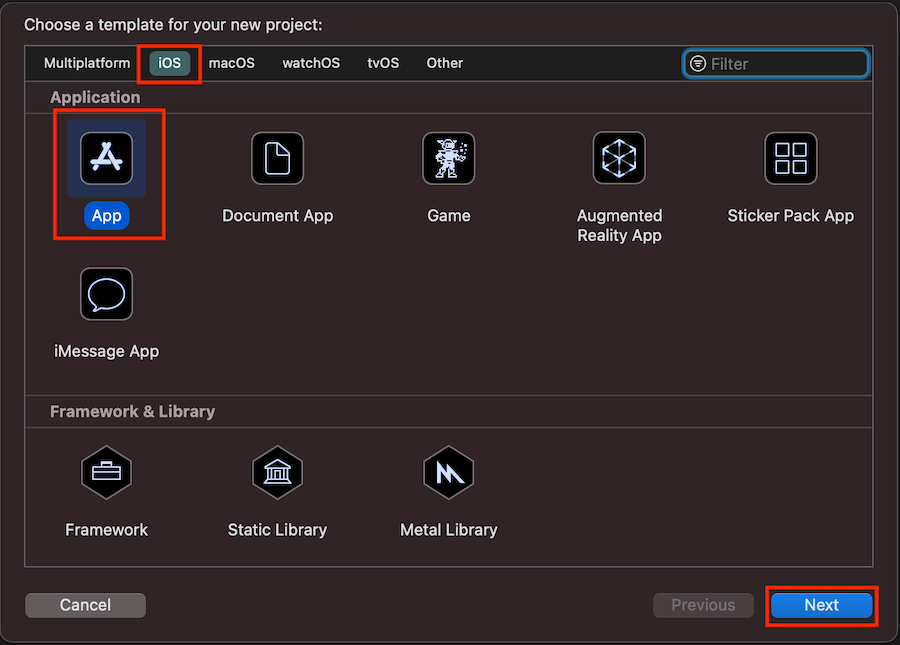
②「Single View App」を選択して、「Next」ボタンを押下。
③「Product Name」にプロジェクト名を入力する。
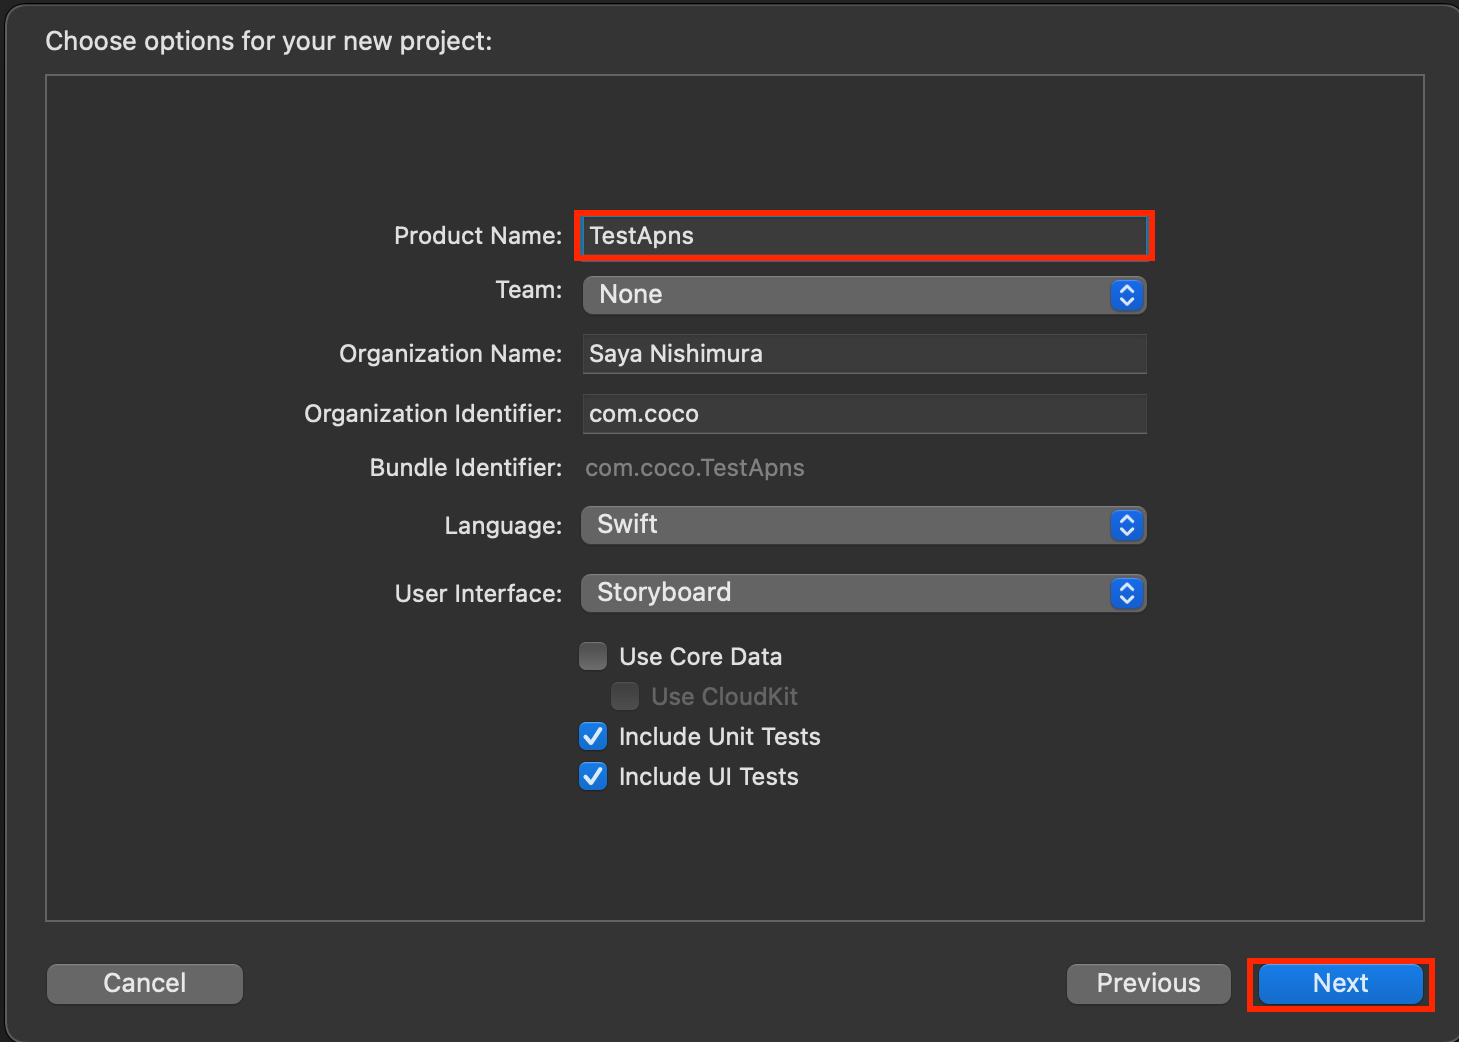
④あとはデフォルト設定のまま進み、最後に「Create」ボタンを押下して下さい。
3-3. Cocoapodのインストール
アプリで通知を受信する為にFirebase SDKを使用しますが、今回はCocoapod(※)を使用してインストールします。
※ Cocoapodとは、iOSやMac向けアプリで使用するライブラリを管理するツールです。
$ sudo gem install cocoapods
インストールが完了したら、正常にインストールされている事を確認するために、下記コマンドでバージョンを確認しましょう。
$ pod --version
確認出来たら、下記コマンドでセットアップします。
※version1.8.0以降、特にpod setupコマンドを実行しなくても使えるようなのですが、今後必要になる可能性を考えてコマンド自体は残しあるとか・・・
今回は理由はありませんが、実行する事とします。
$ pod setup
3-4. Firebase SDKのインストール
まず、Podfileを作成します。
$ cd {ワークフォルダ}
$ pod init
$ ls
//Podfileが作成されていることを確認
PodfileにFirebase Podを追加します。
$ vi Podfile
//以下を追加
pod 'Firebase/Core'
pod 'Firebase/Messaging'

$ cat Podfile
//以下が追加されていることを確認。
pod 'Firebase/Core'
pod 'Firebase/Messaging'
Podをインストールします。
$ pod install
Analyzing dependencies
Adding spec repo trunk with CDN https://cdn.cocoapods.org/
Downloading dependencies
Installing Firebase (7.9.0)
Installing FirebaseAnalytics (7.9.0)
Installing FirebaseCore (7.9.0)
Installing FirebaseCoreDiagnostics (7.9.0)
Installing FirebaseInstallations (7.9.0)
Installing FirebaseInstanceID (7.9.0)
Installing FirebaseMessaging (7.9.0)
Installing GoogleAppMeasurement (7.9.0)
Installing GoogleDataTransport (8.3.1)
Installing GoogleUtilities (7.3.1)
Installing PromisesObjC (1.2.12)
Installing nanopb (2.30907.0)
Generating Pods project
Integrating client project

[!] Please close any current Xcode sessions and use TestApns.xcworkspace for this project from now on.
Pod installation complete! There are 2 dependencies from the Podfile and 12 total pods installed.

[!] Automatically assigning platform iOS with version 13.4 on target TestApns because no platform was specified. Please specify a platform for this target in your Podfile. See https://guides.cocoapods.org/syntax/podfile.html#platform.
インストールが完了すると、{プロジェクト名}.xcworkspaceが作成されます。
以下コマンドで、プロジェクトをエラーなく開けるか確認してみましょう。
(ちなみに「4.実装」では以下コマンドで開いたプロジェクトにて作業していくので、開いたままにしておくと良いです。)
$ open TestApns.xcworkspace
3-5. Firebaseプロジェクトの登録とアプリの登録を行う
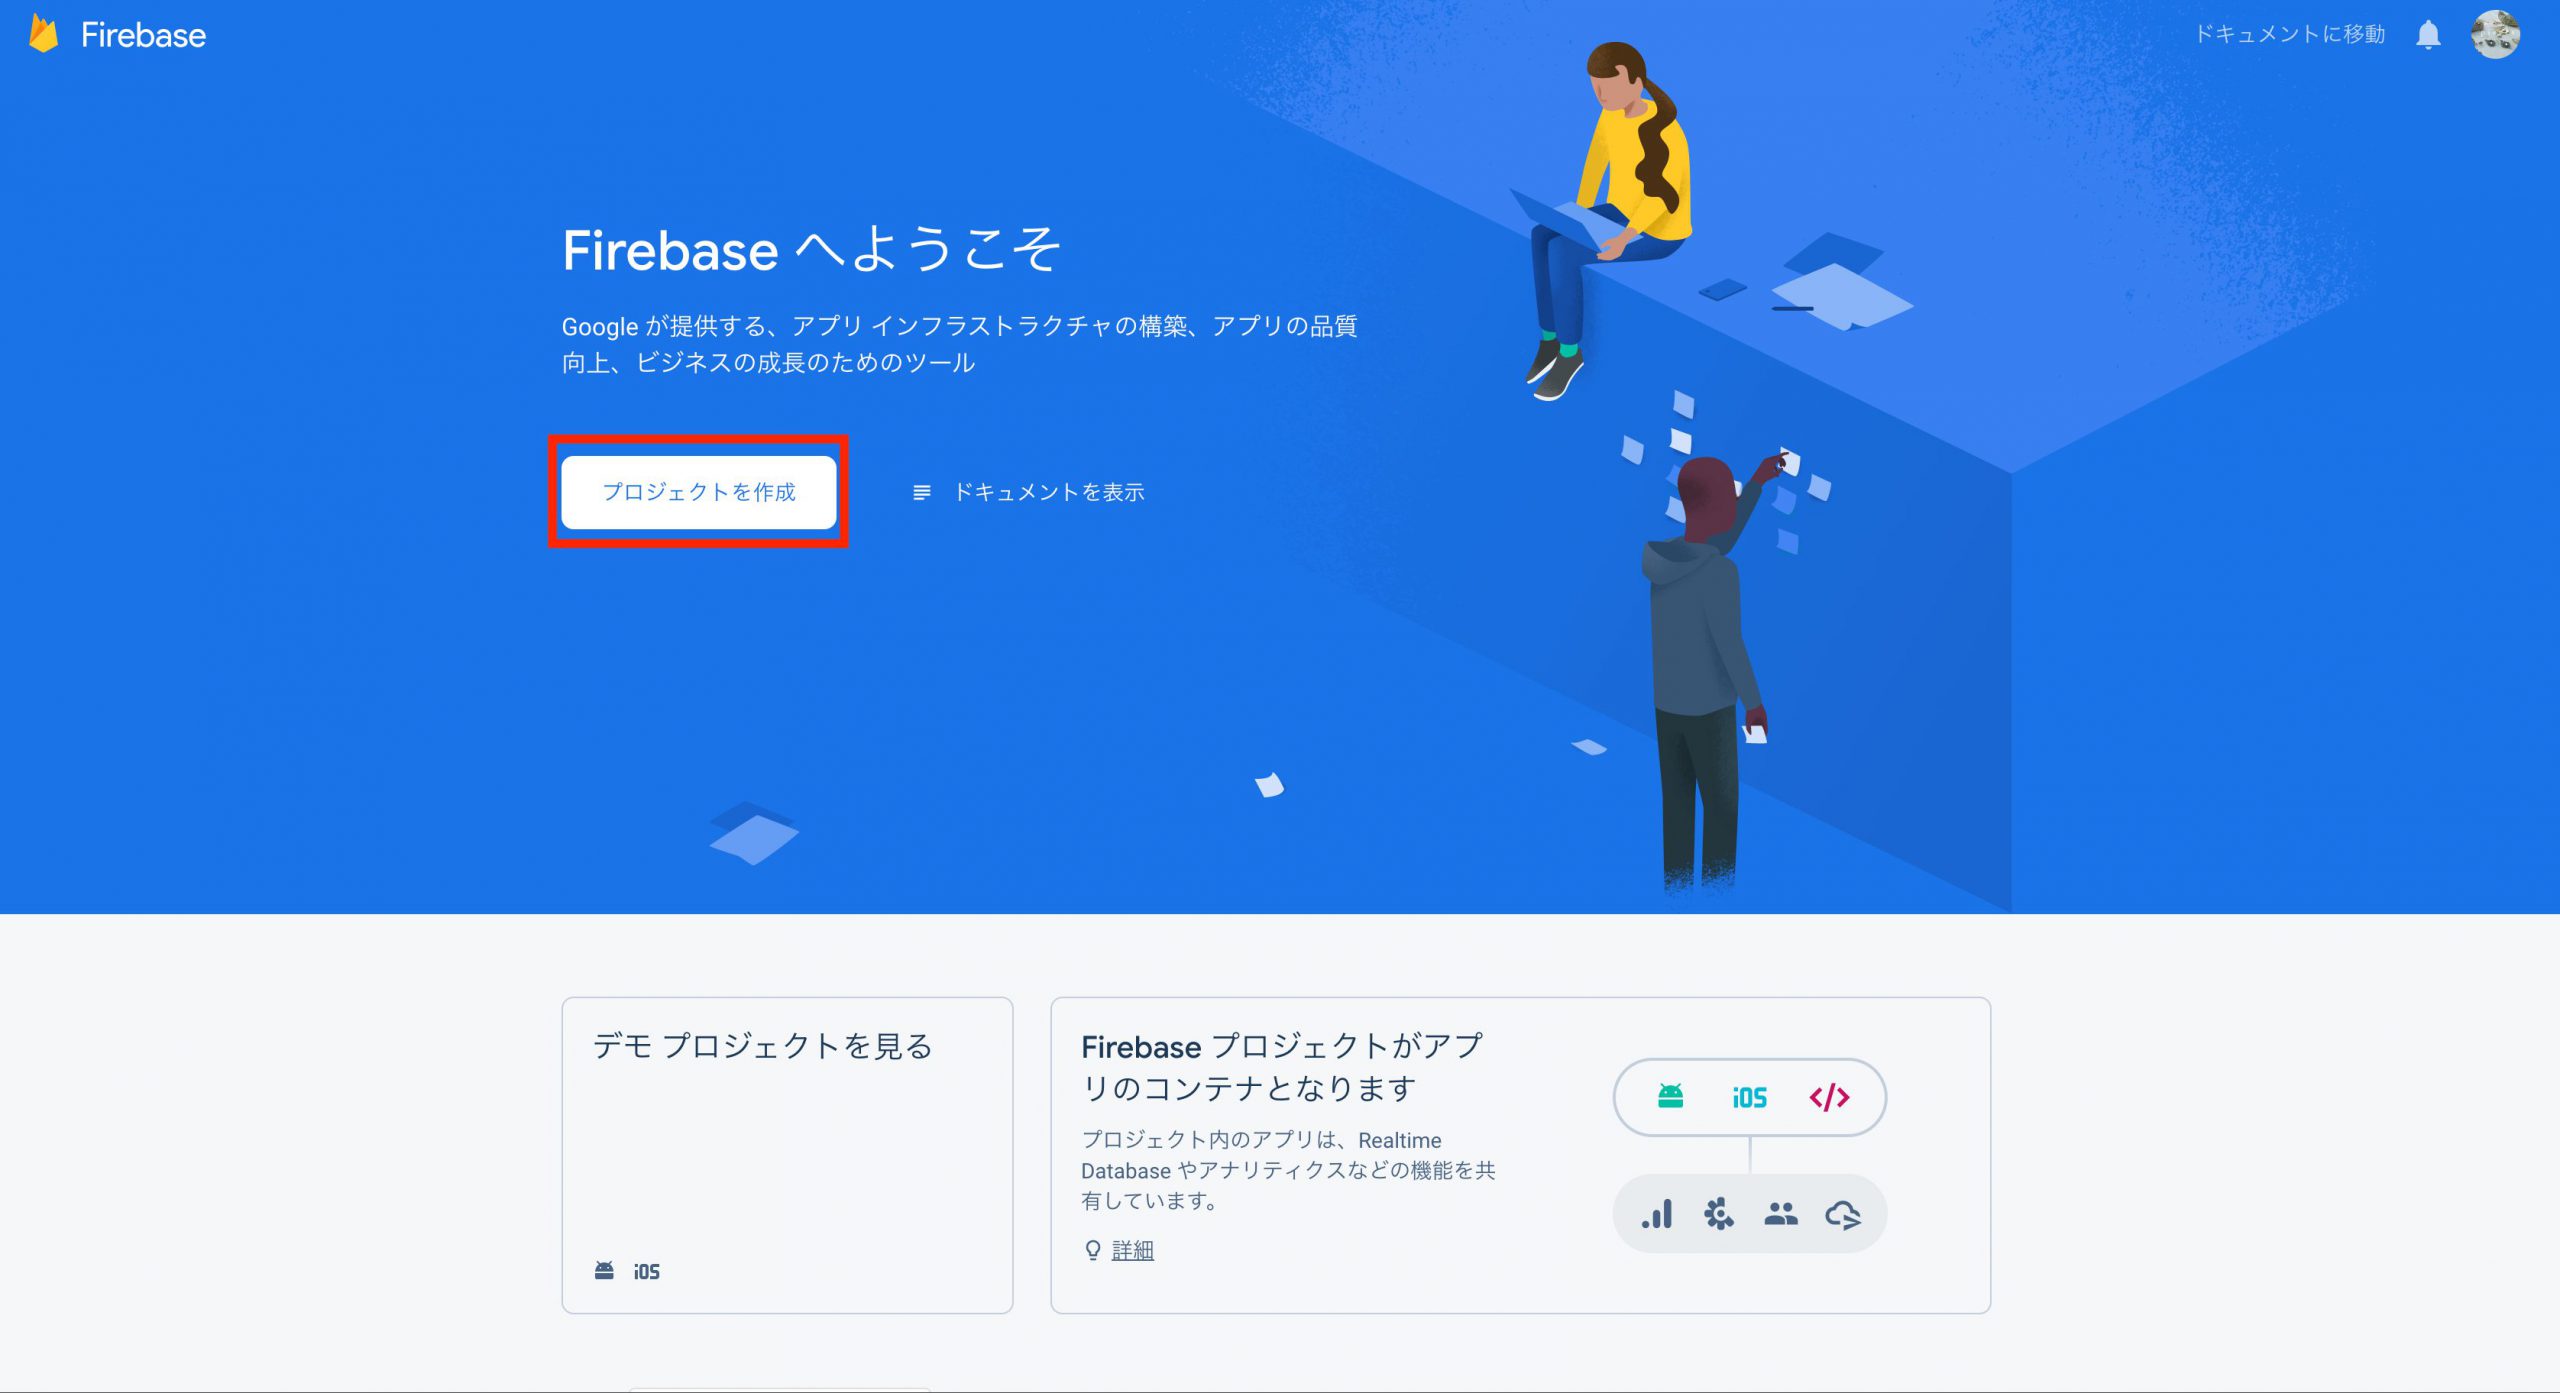
①Firebaseコンソールよりプロジェクトを登録する。
【Firebase公式】Firebaseコンソールにて「プロジェクト作成」をクリック。
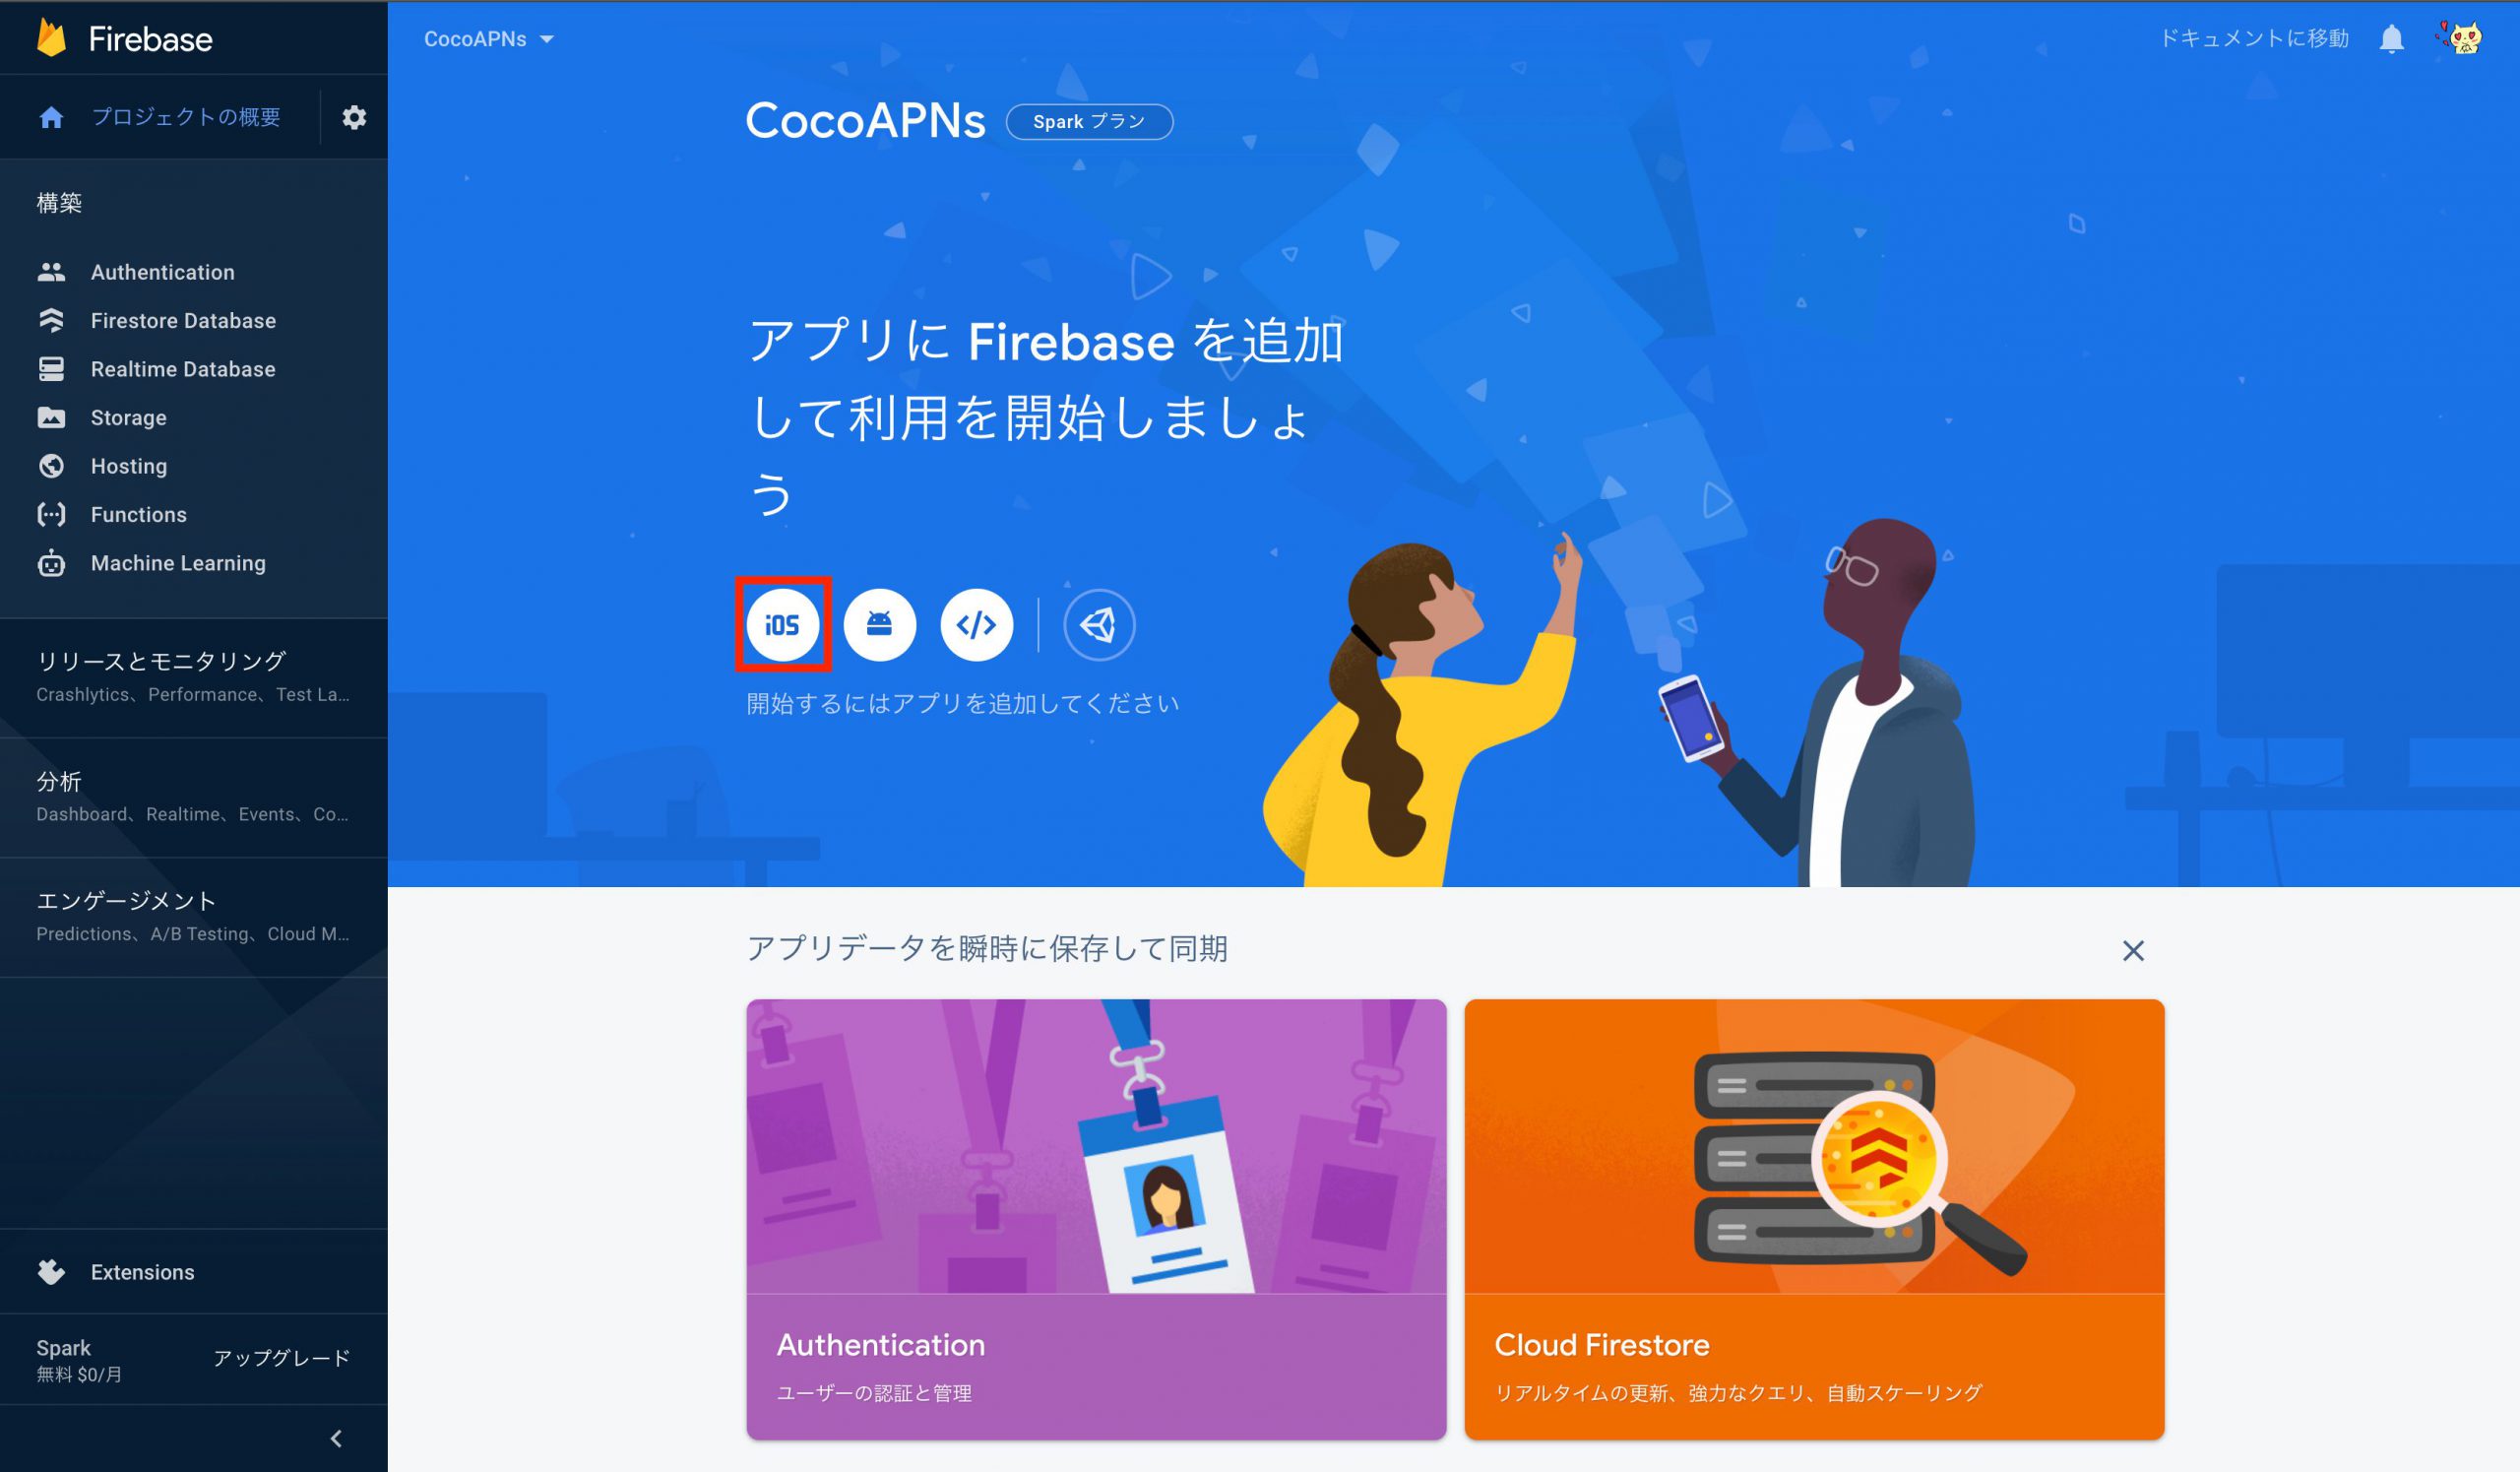
②アプリを登録する。
Firebase Consoleにて「iOS」をクリック。
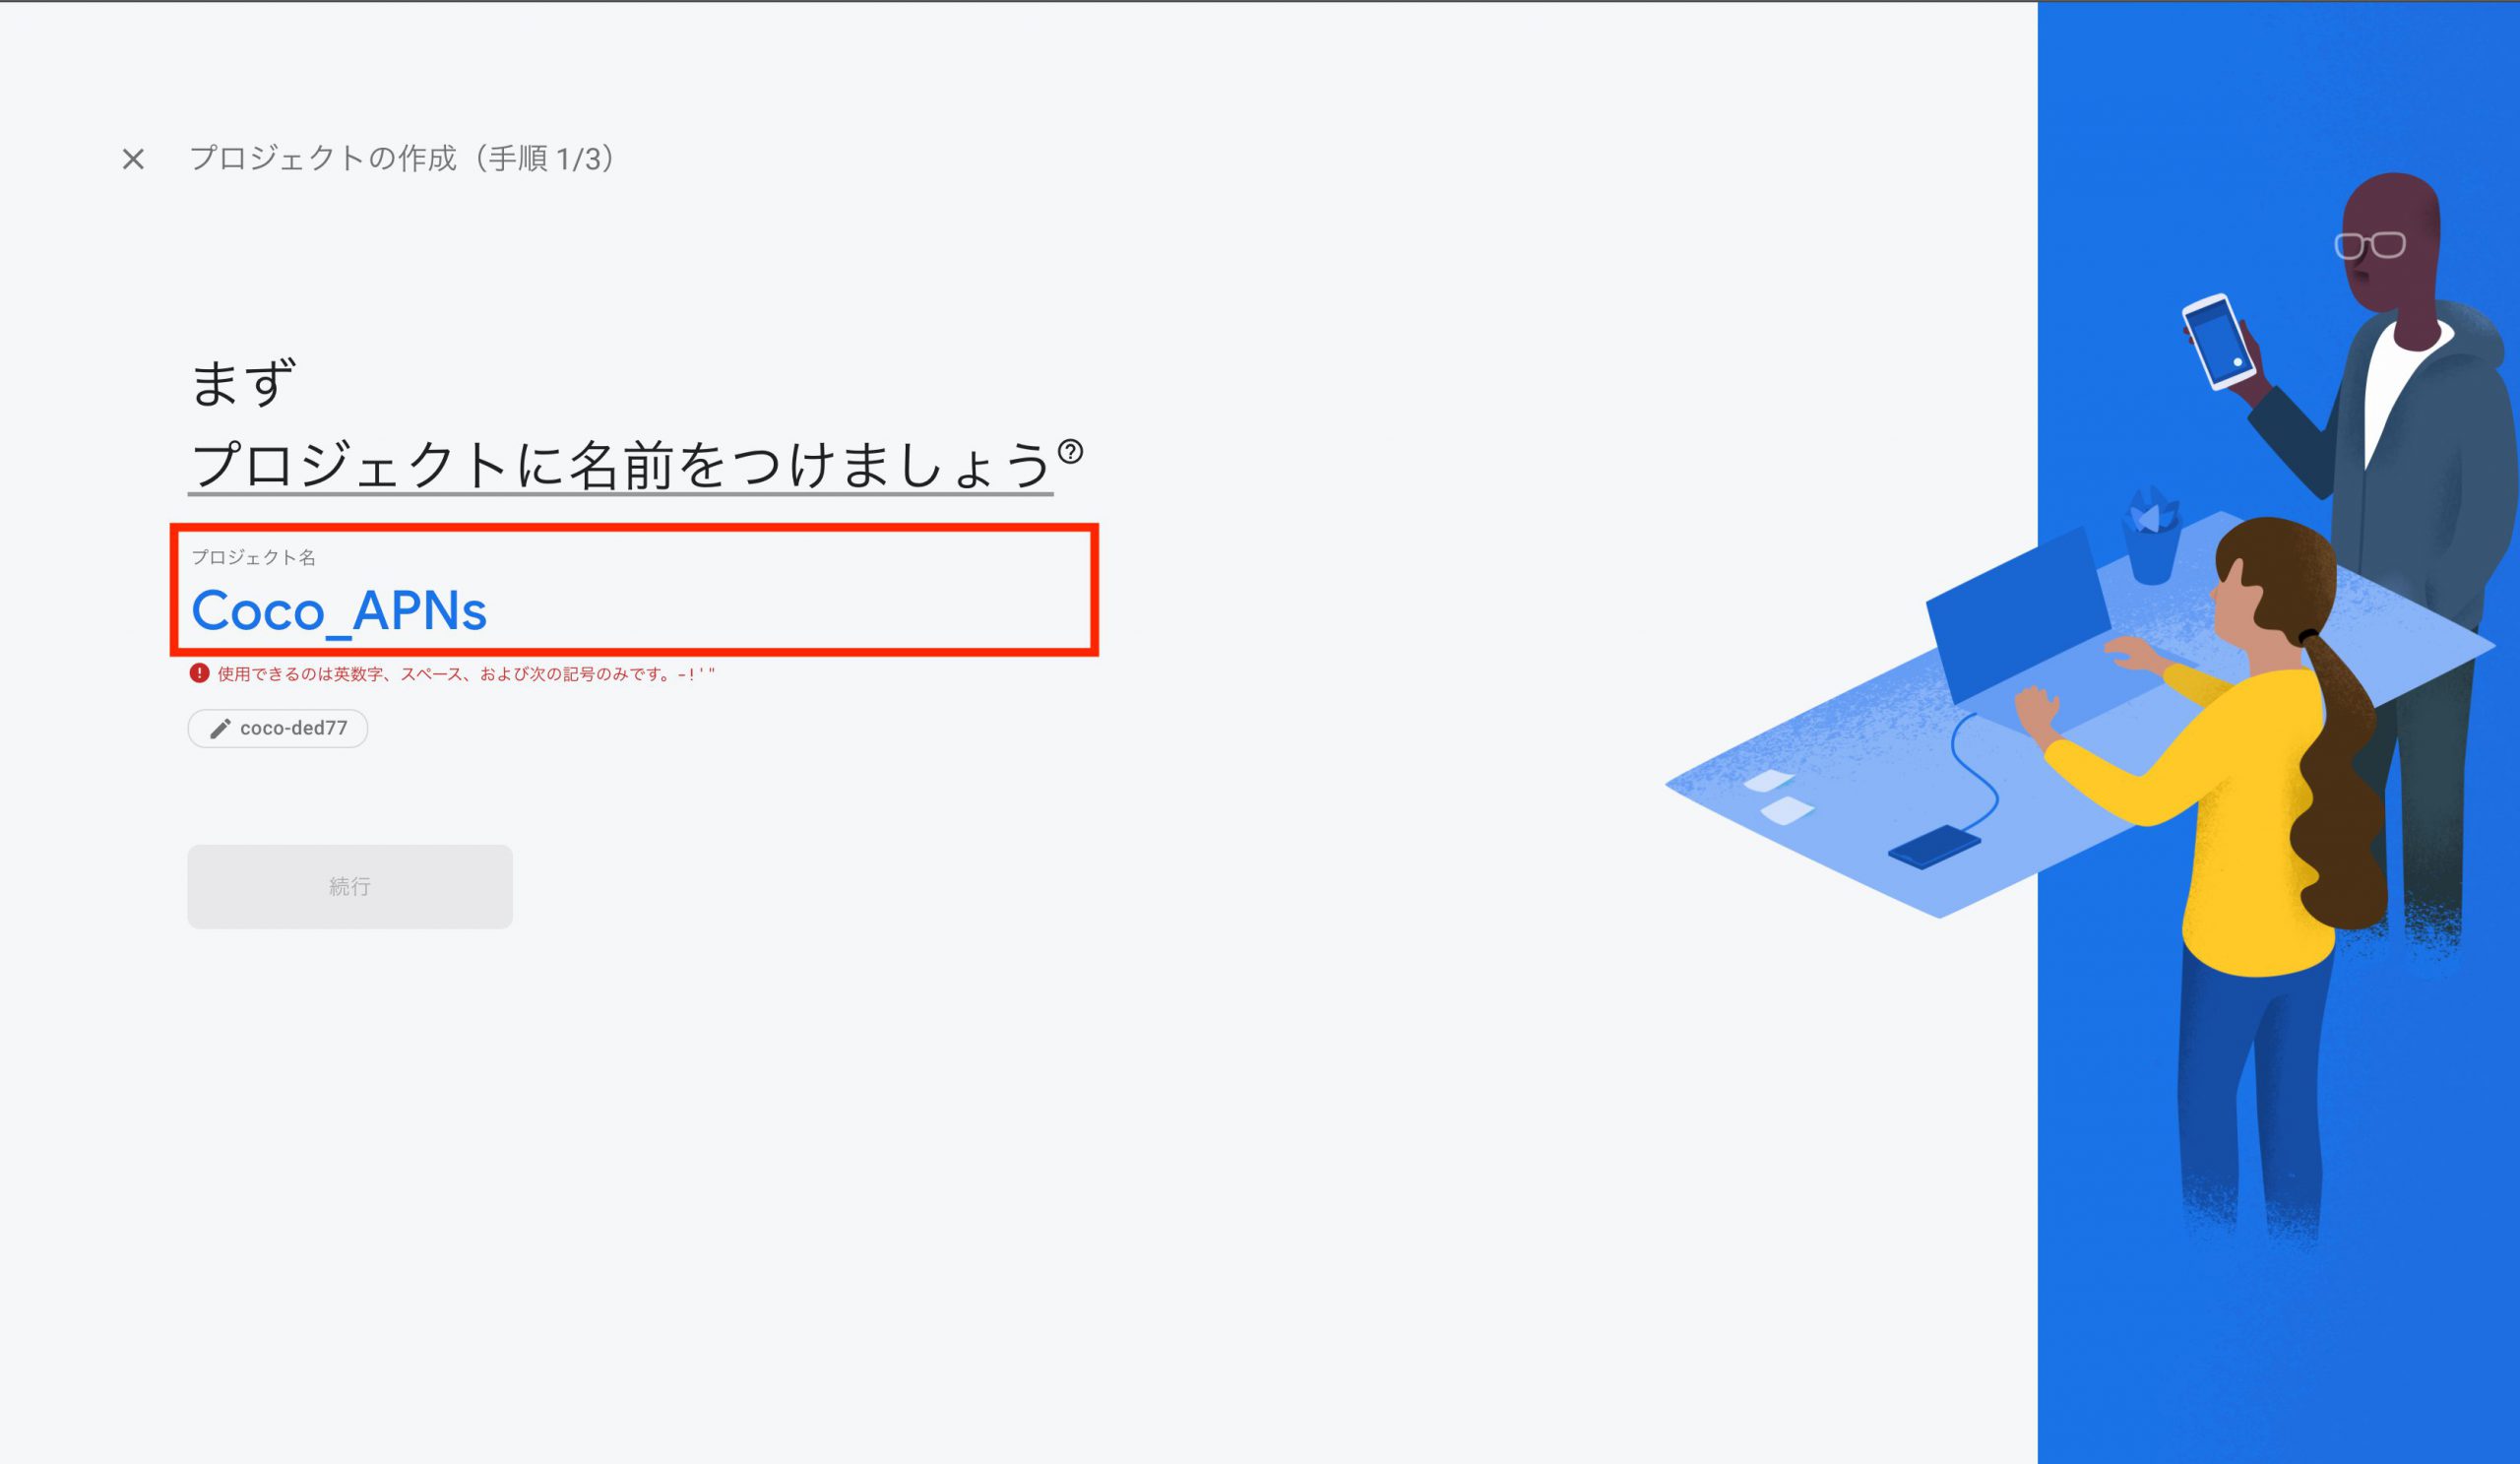
②プロジェクトに名前をつける。
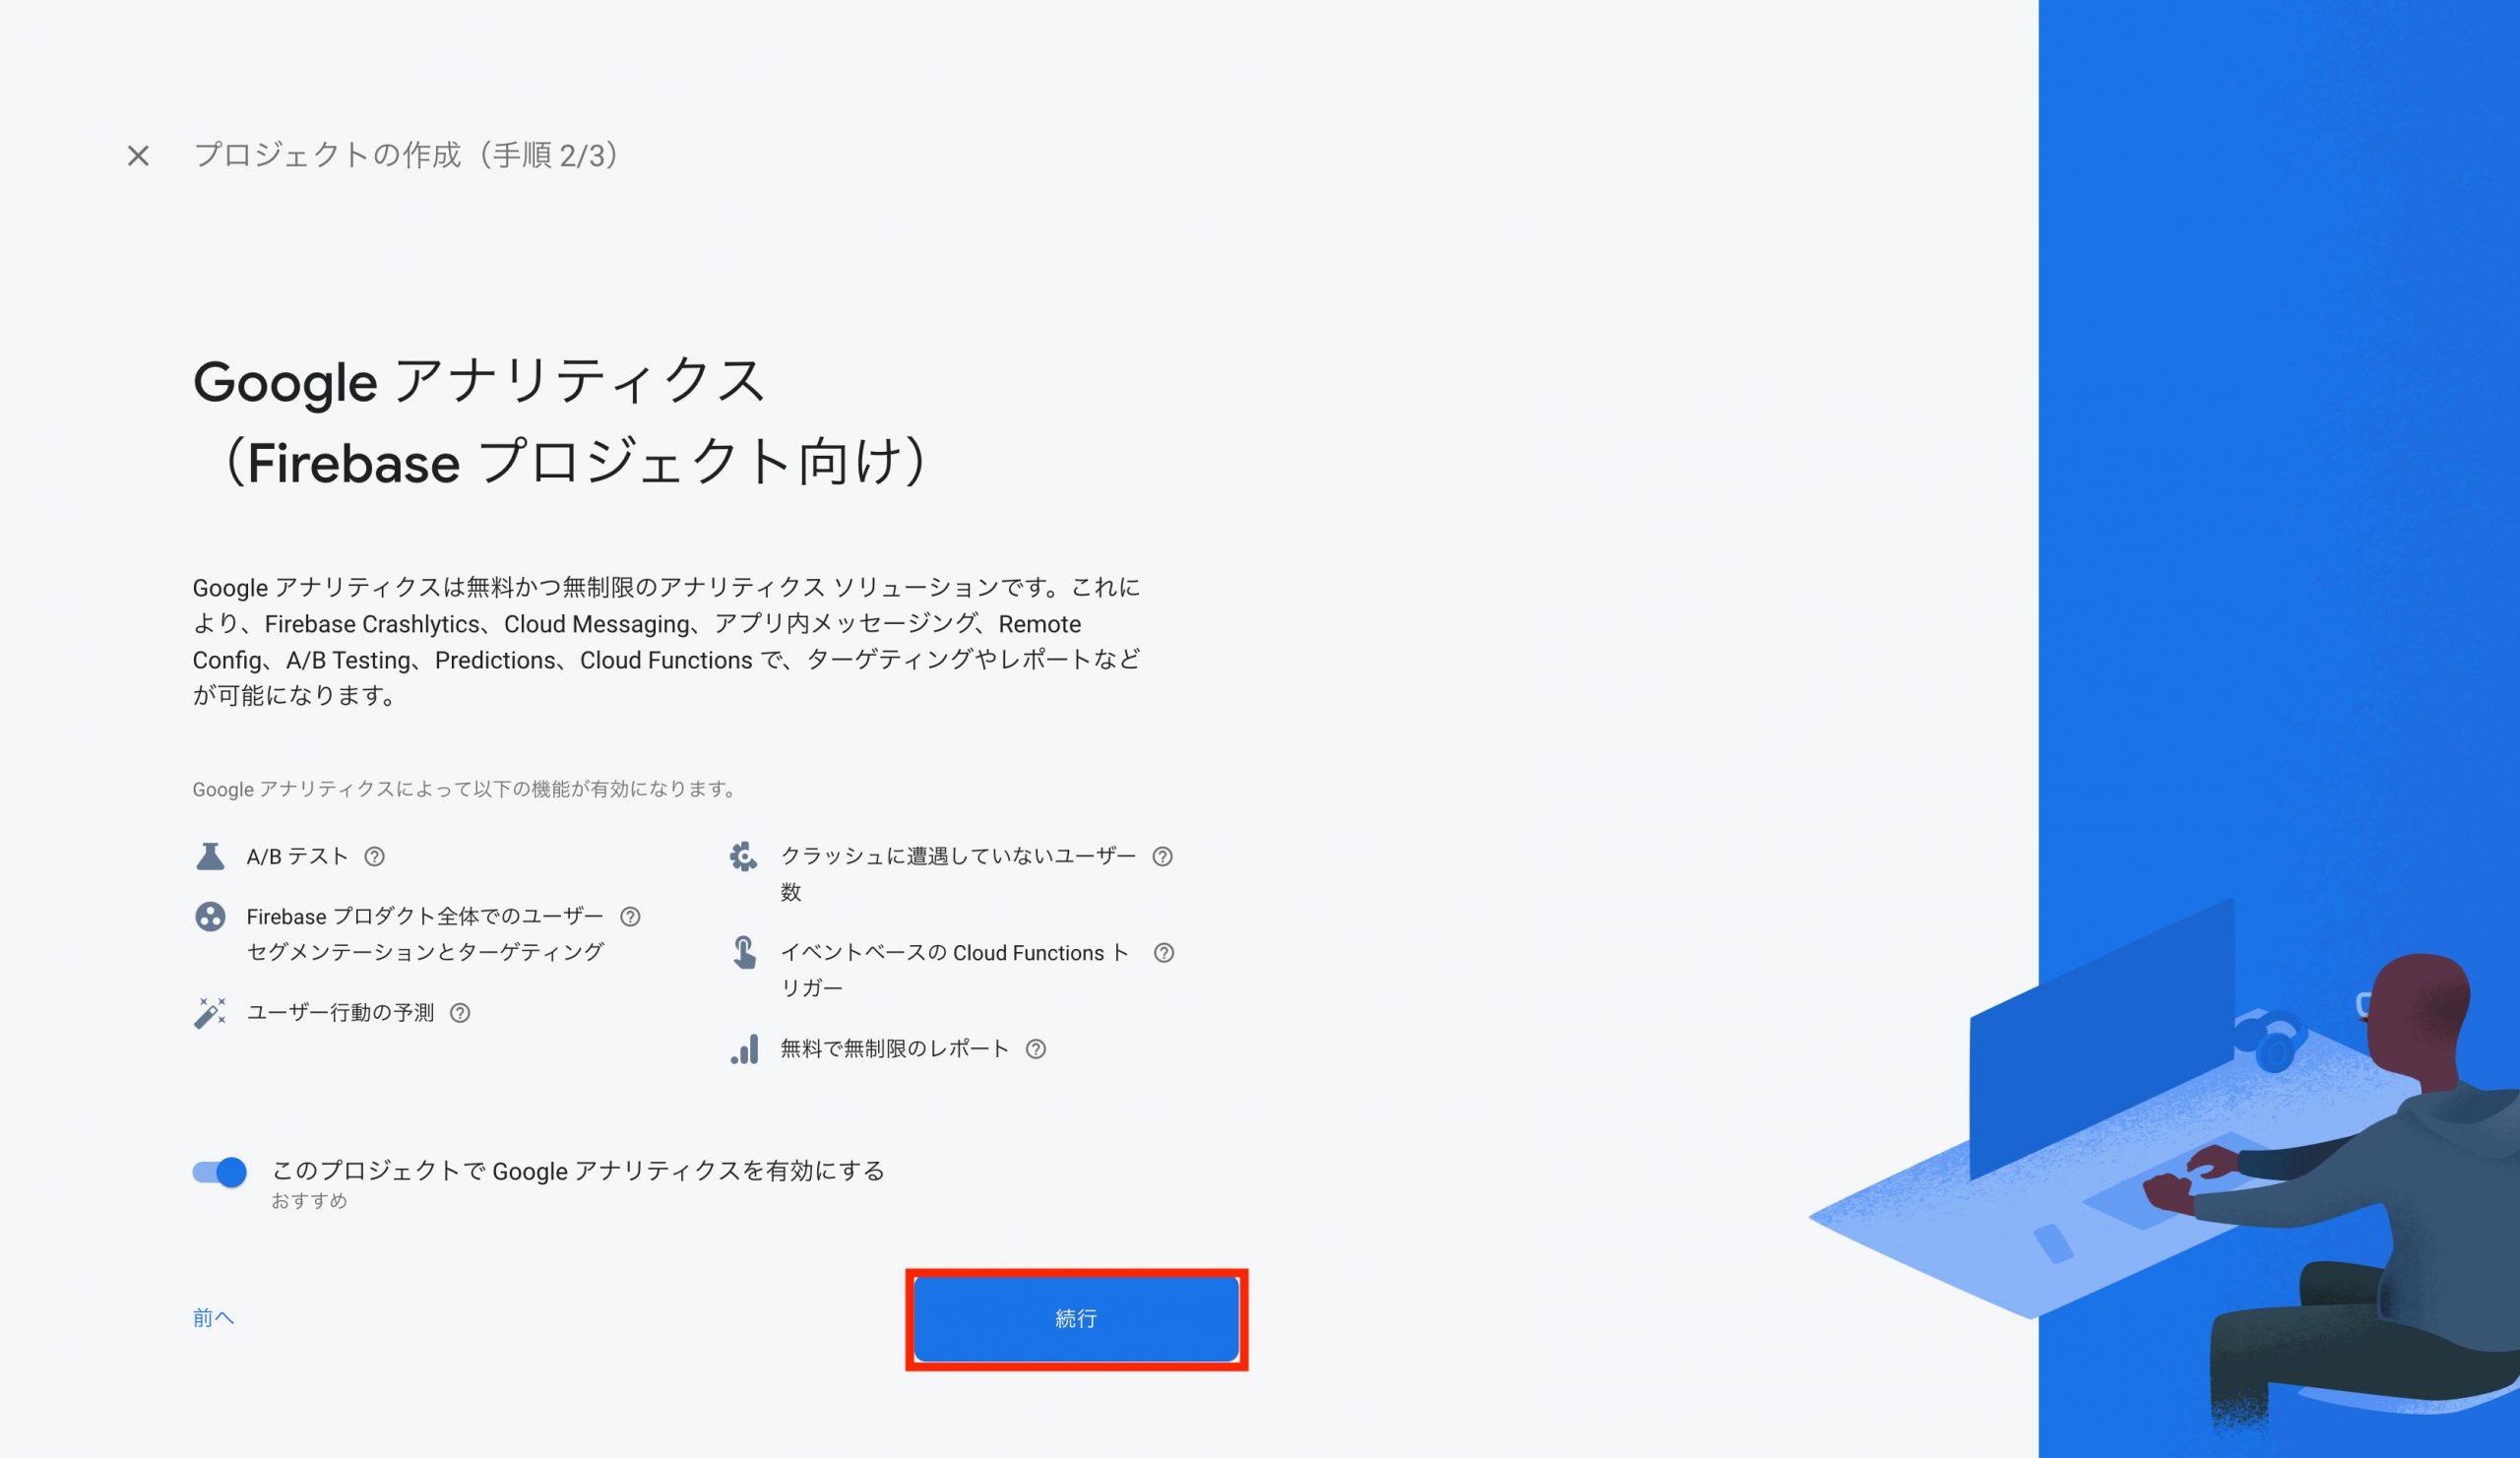
③Googleアナリティクスを有効にする。
今回は特にこだわりないので、有効にしています。
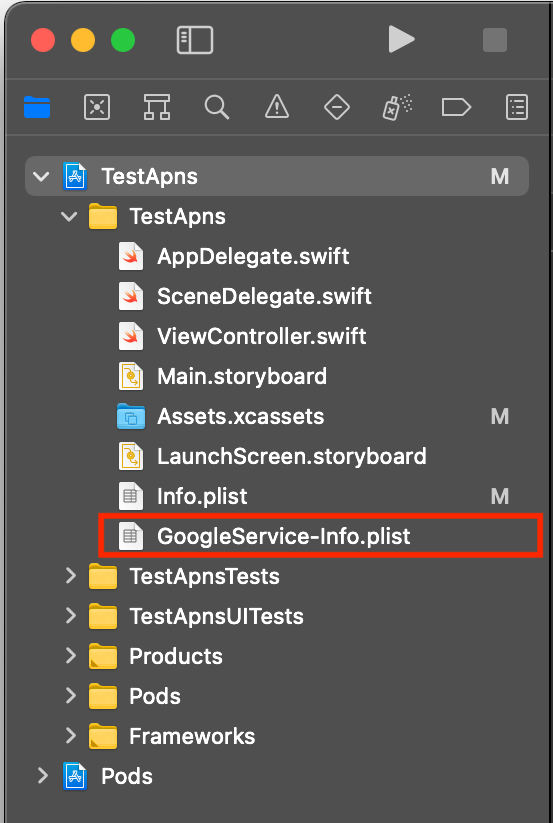
3-6. GoogleService-Info.plistをアプリのプロジェクトに追加する
①Firebaseからplist(※)をエクスポートする。
※ plistとはプロパティリストの略で、文字通りプロパティ情報が記載されているファイルです。
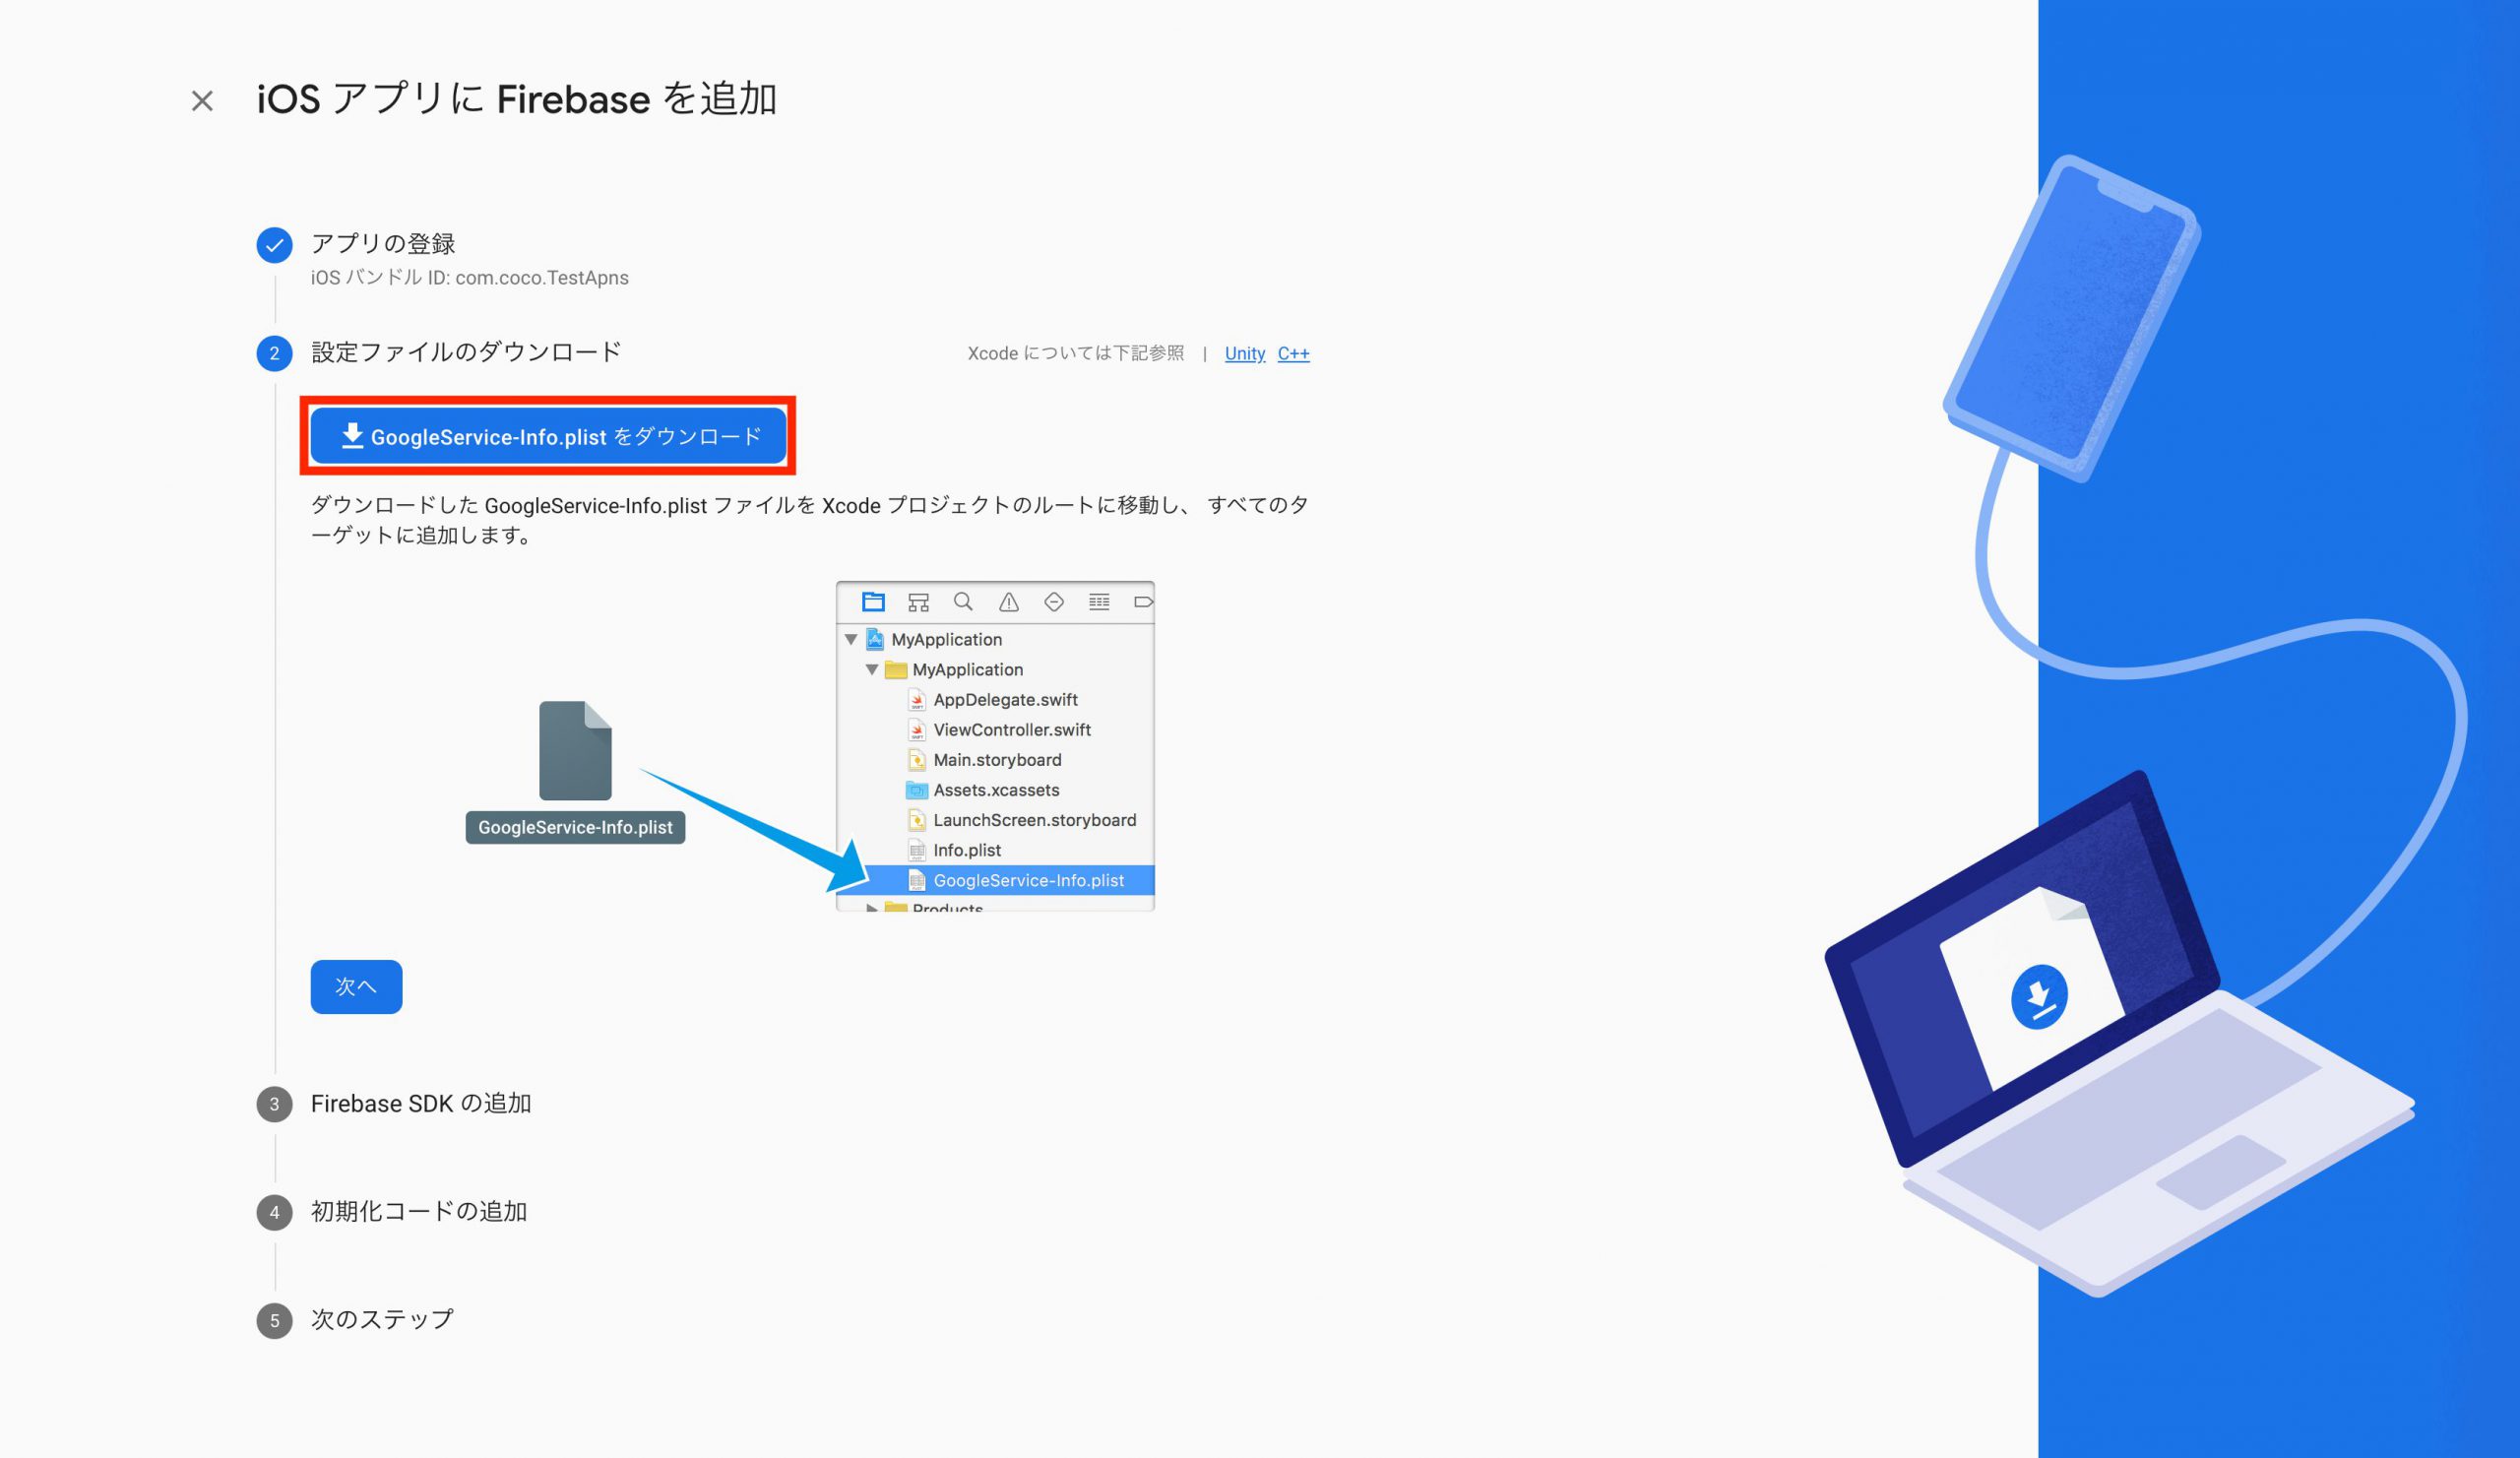
②plistをプロジェクトに追加する。
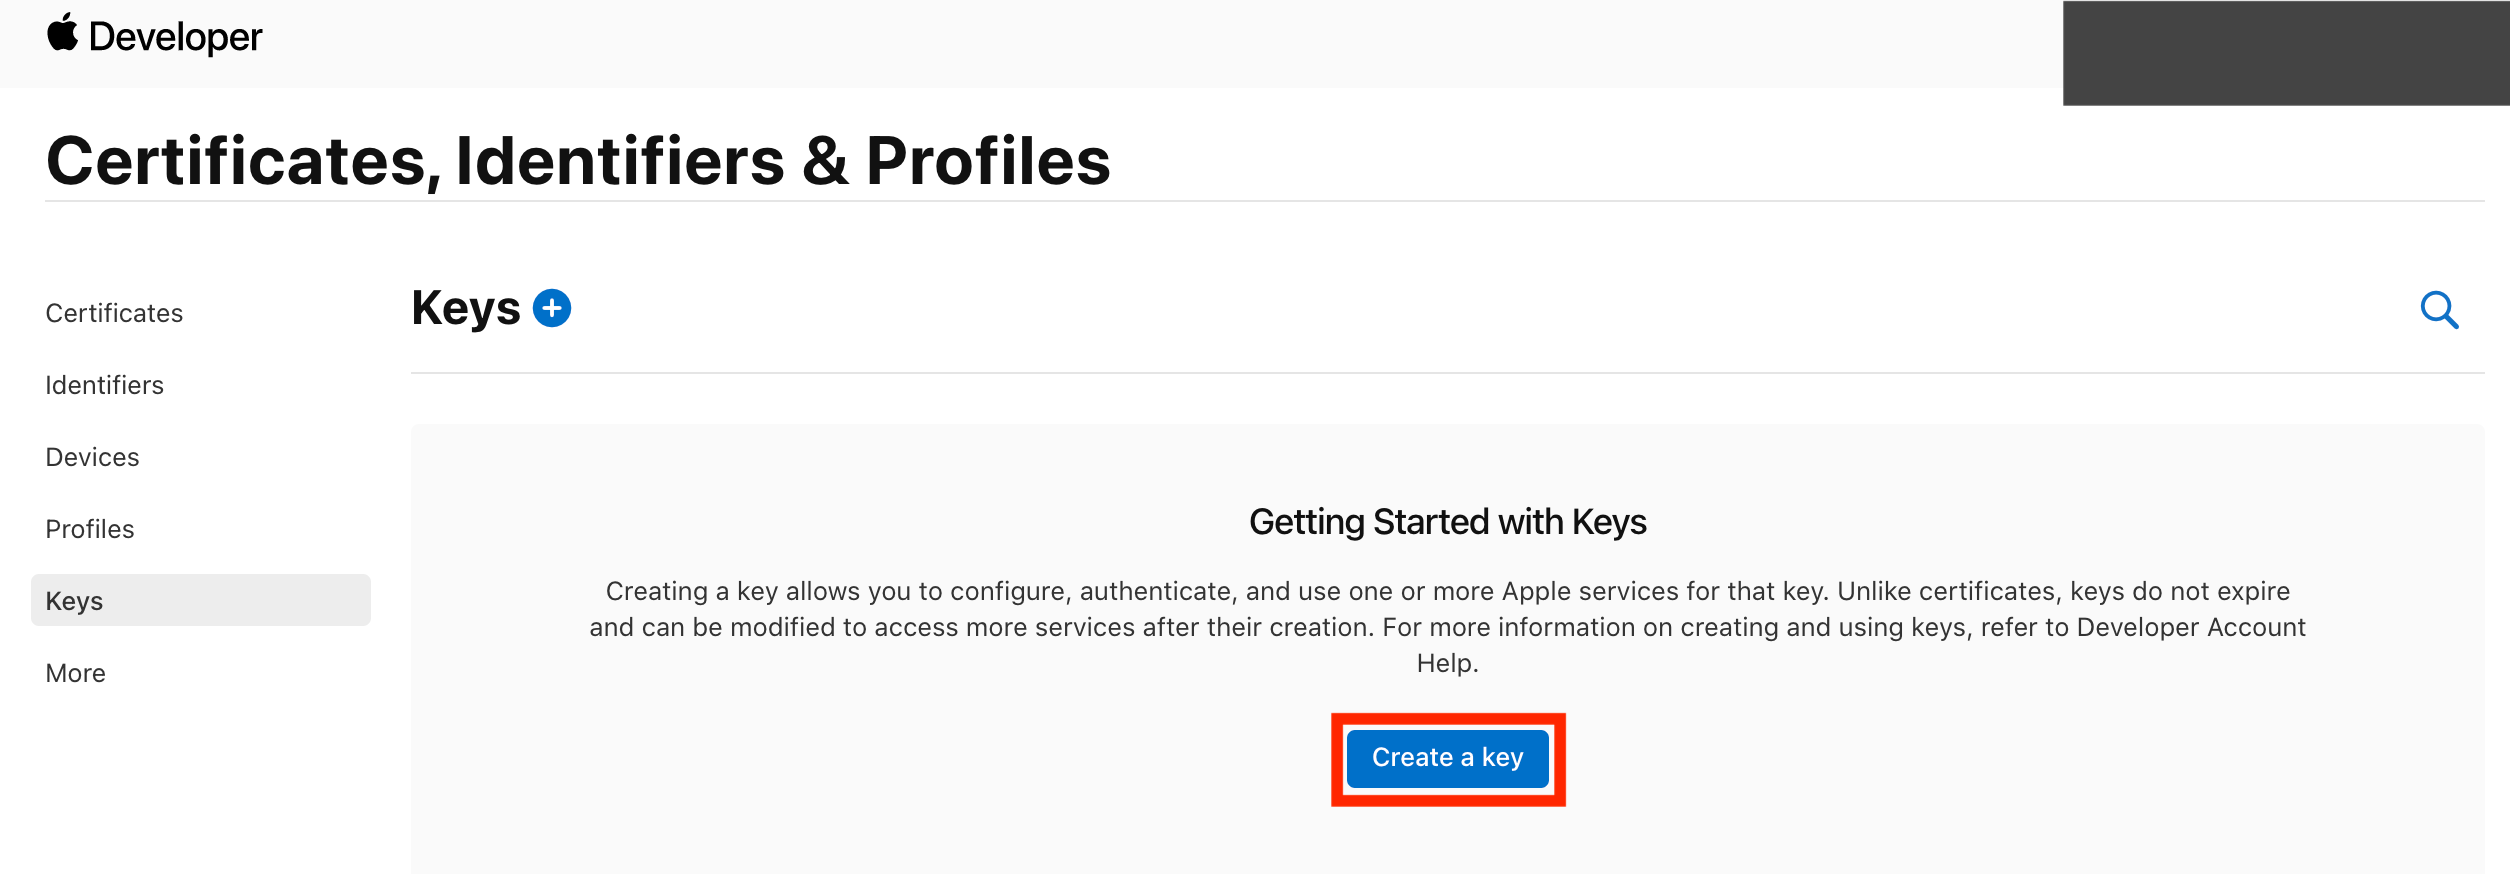
3-7. Apple Developer ProgramでAPNs認証キーを作成する
Apple Developer Programを開きます。
①まずCreate a Keyボタンを押下。
②KeyNameを設定し、Apple Push Notifications services(APNs)にチェックをつけ、Continueボタンを押下。
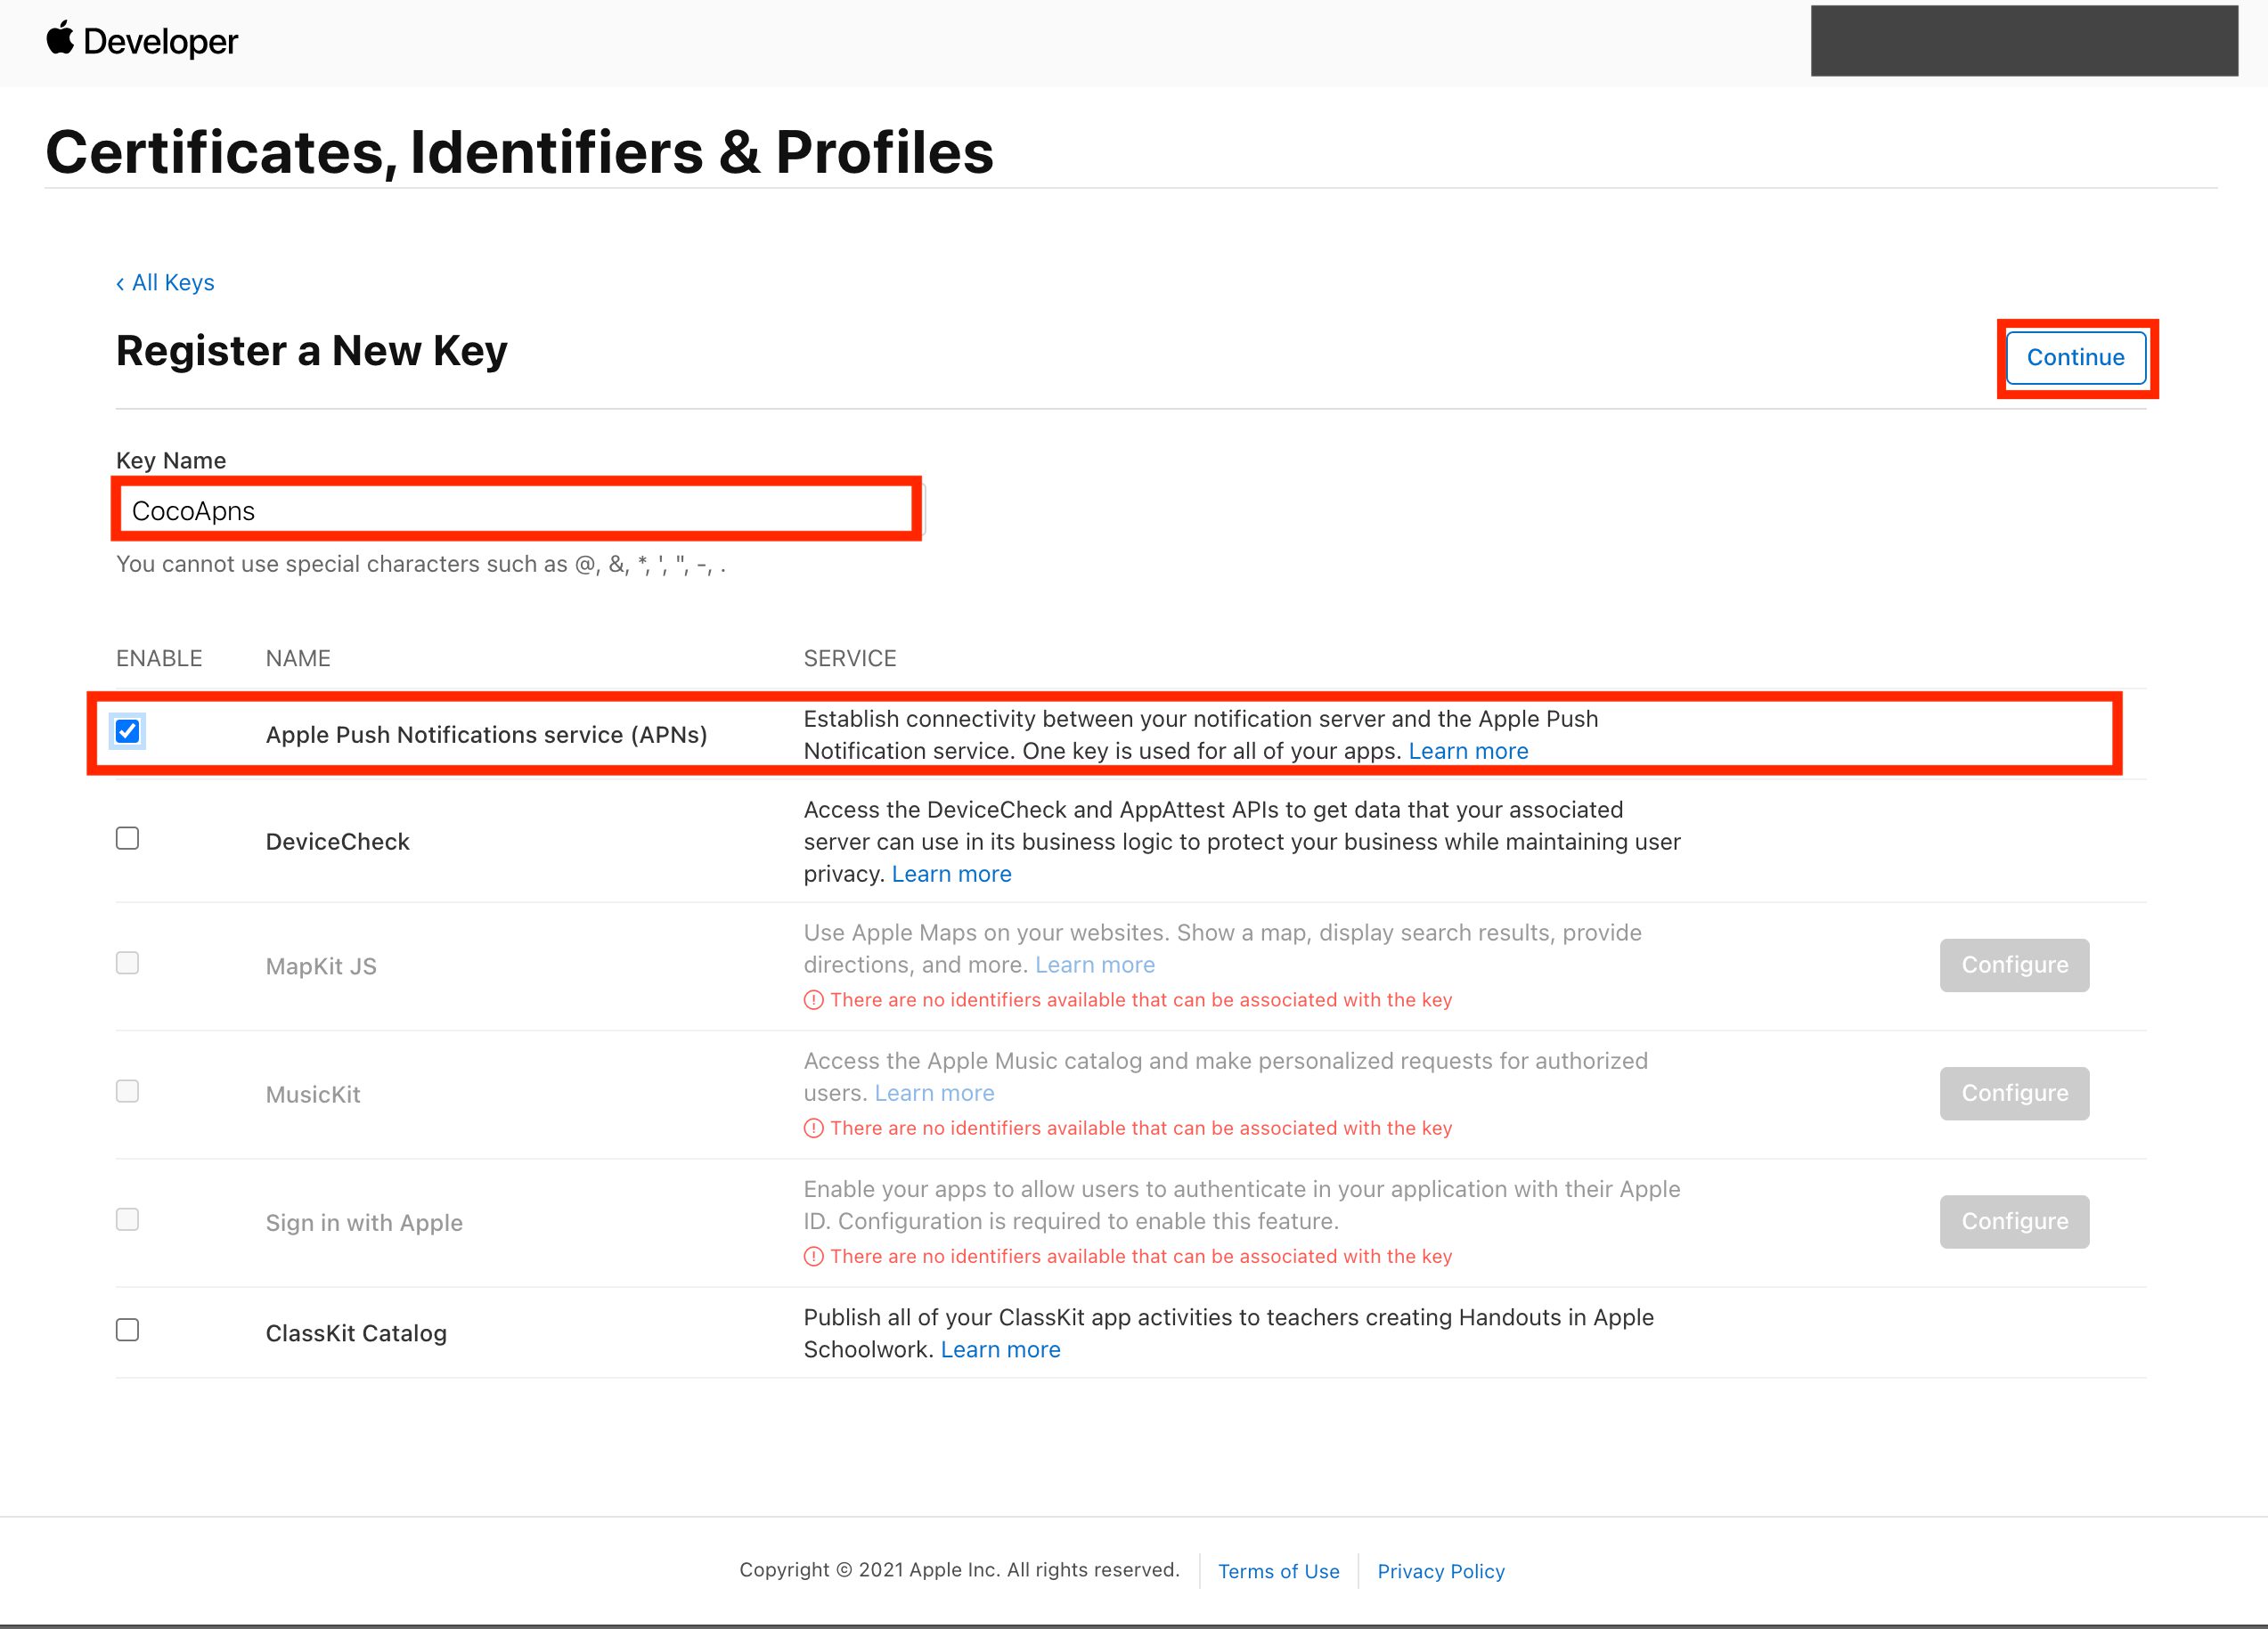
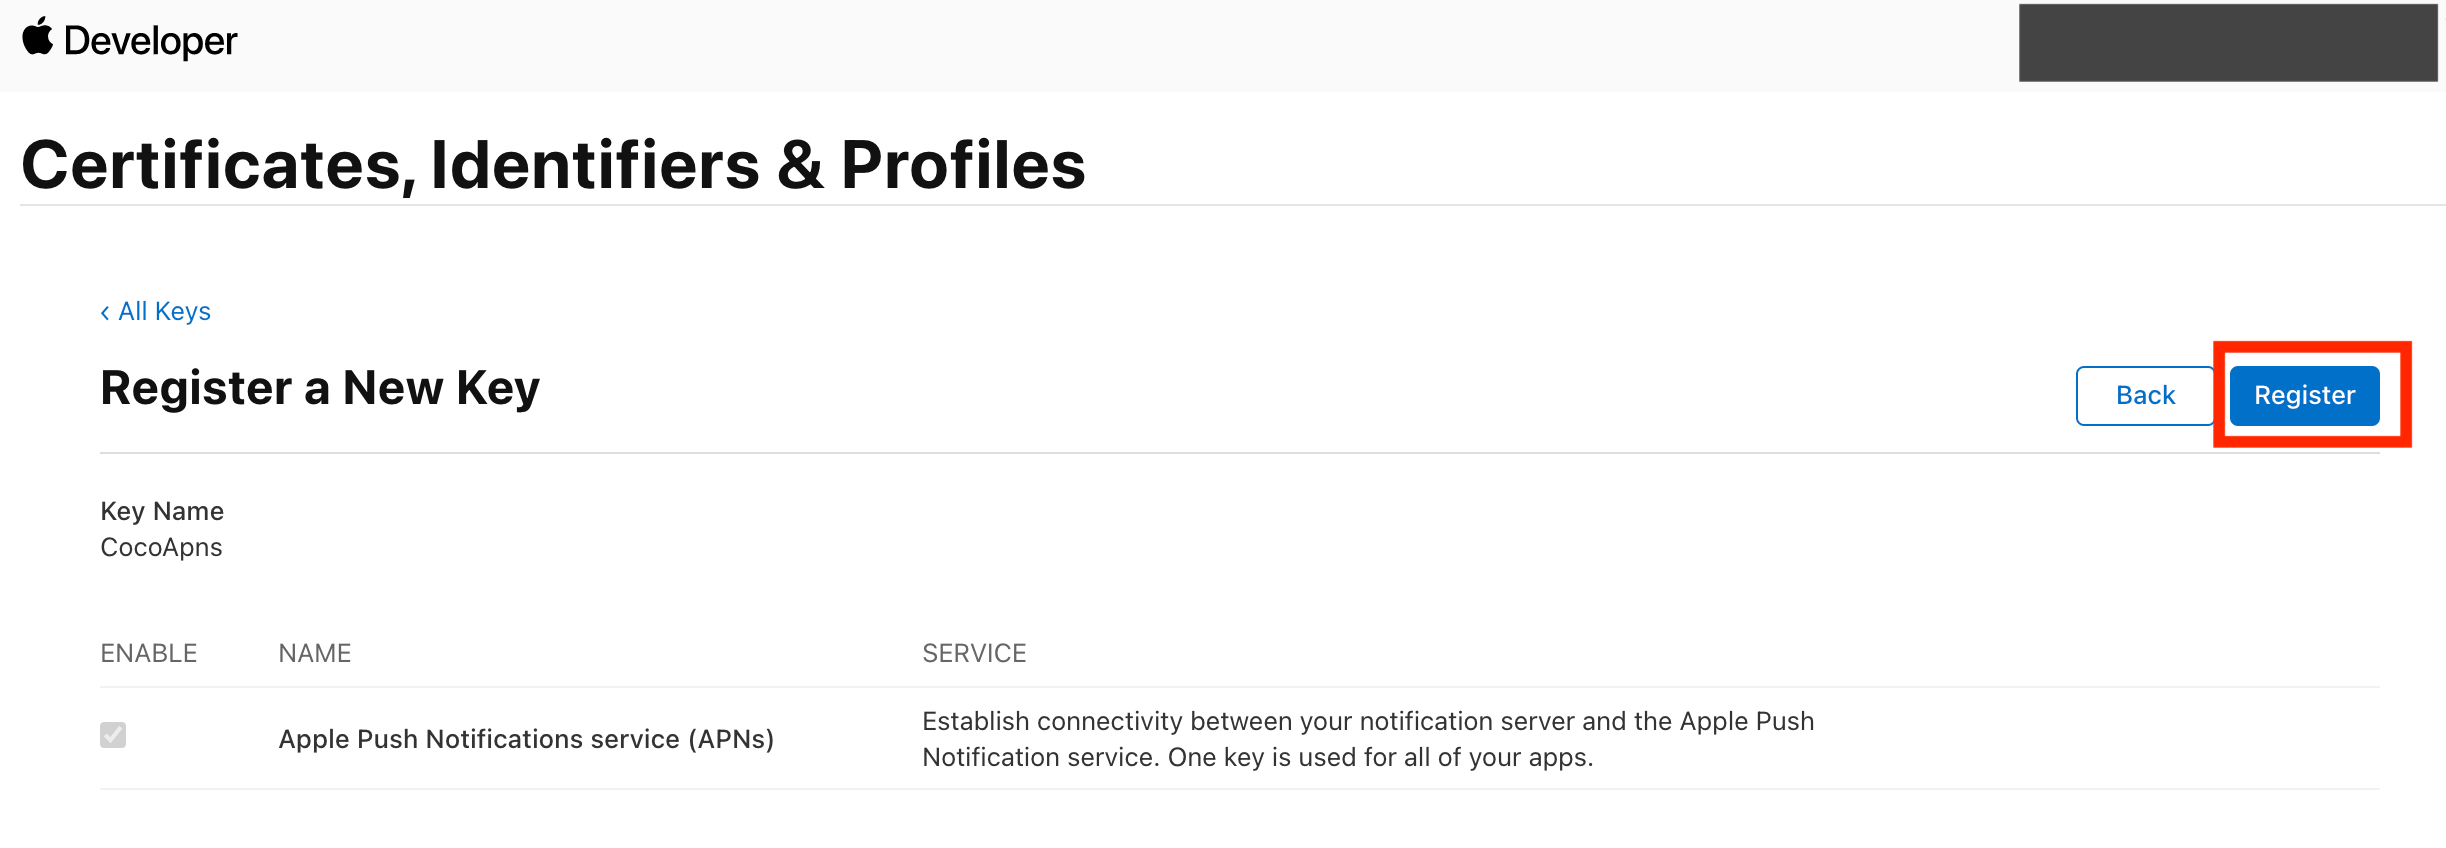
③Registerボタンを押下し、APNs認証キーをダウンロードする。
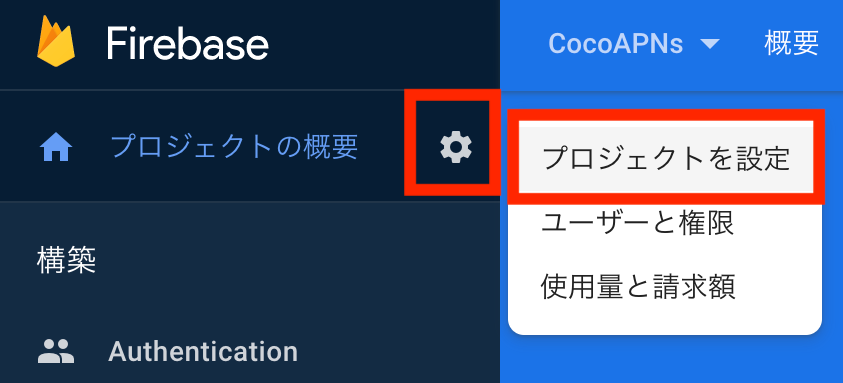
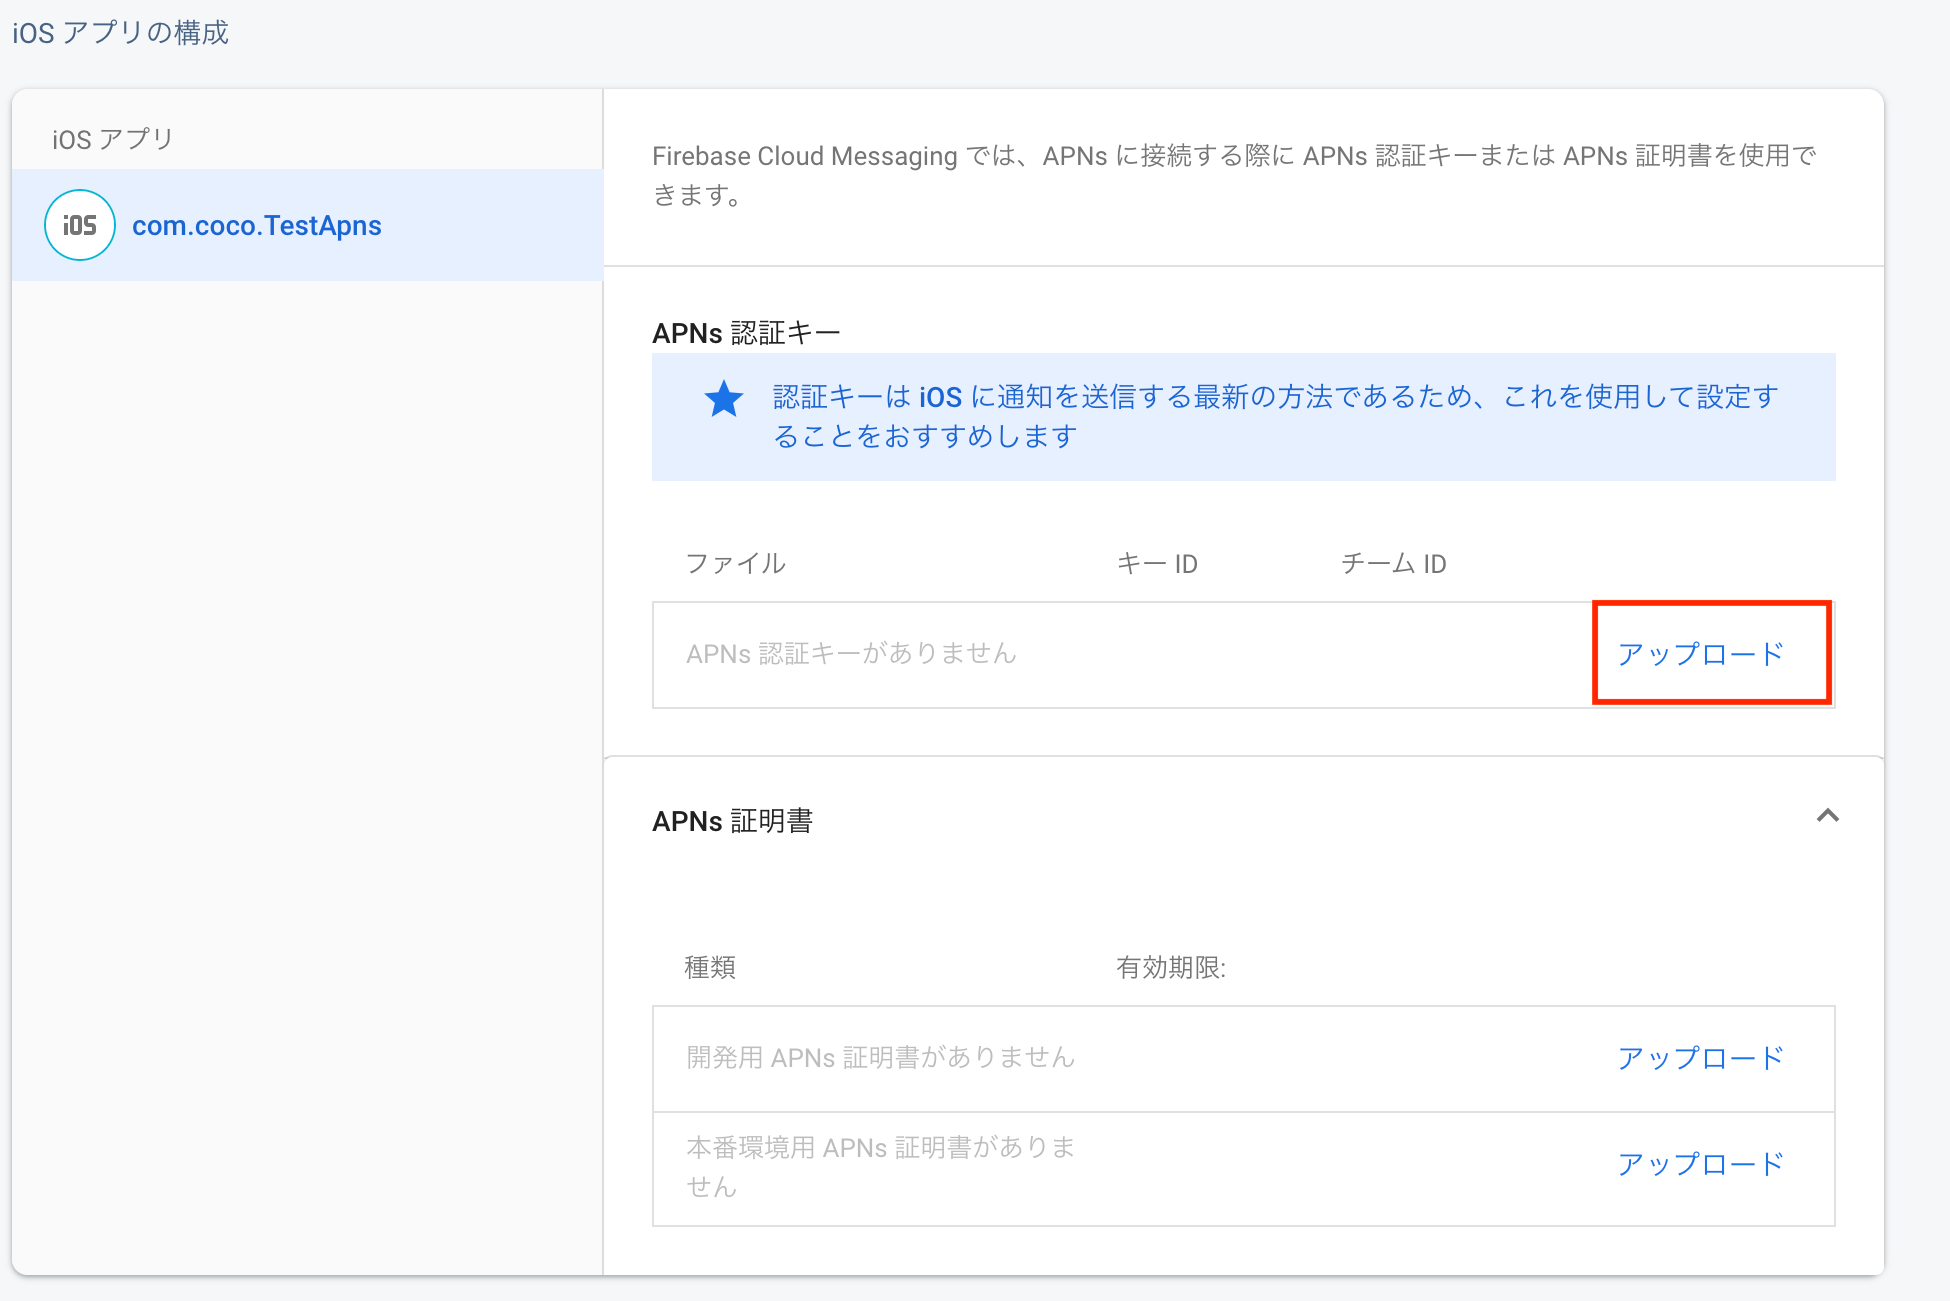
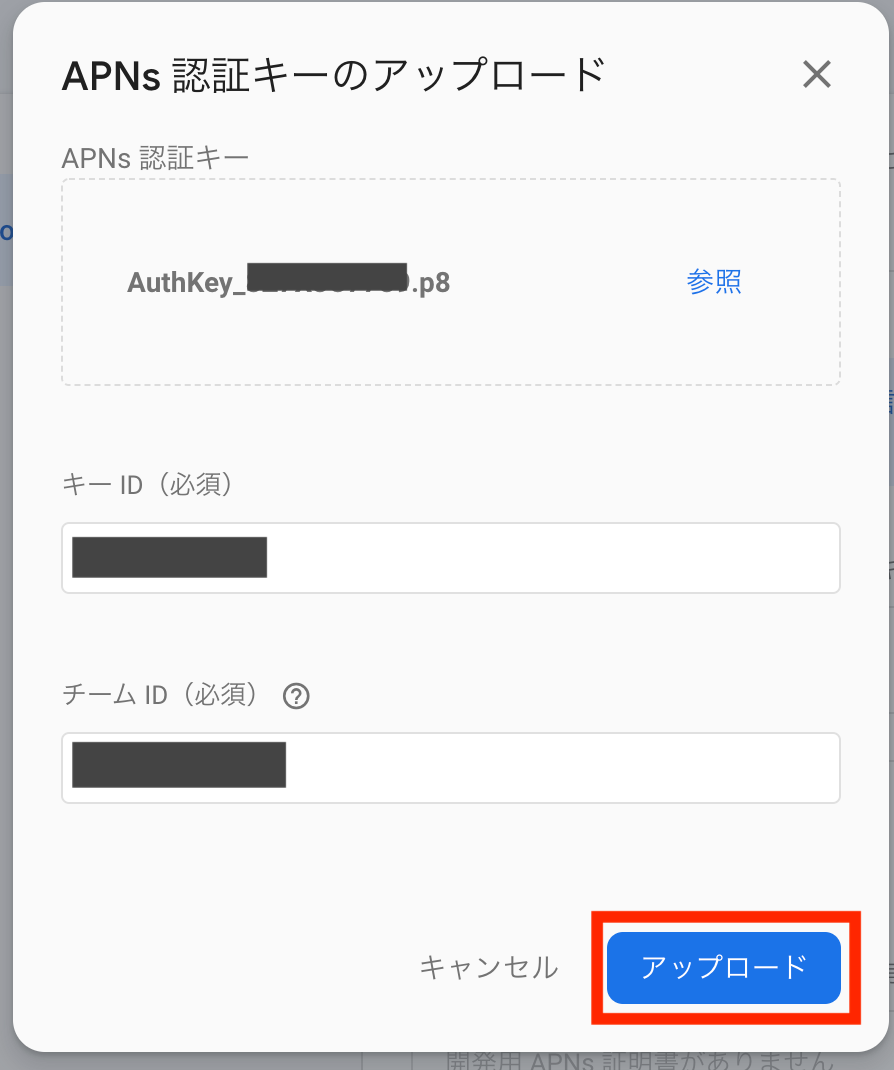
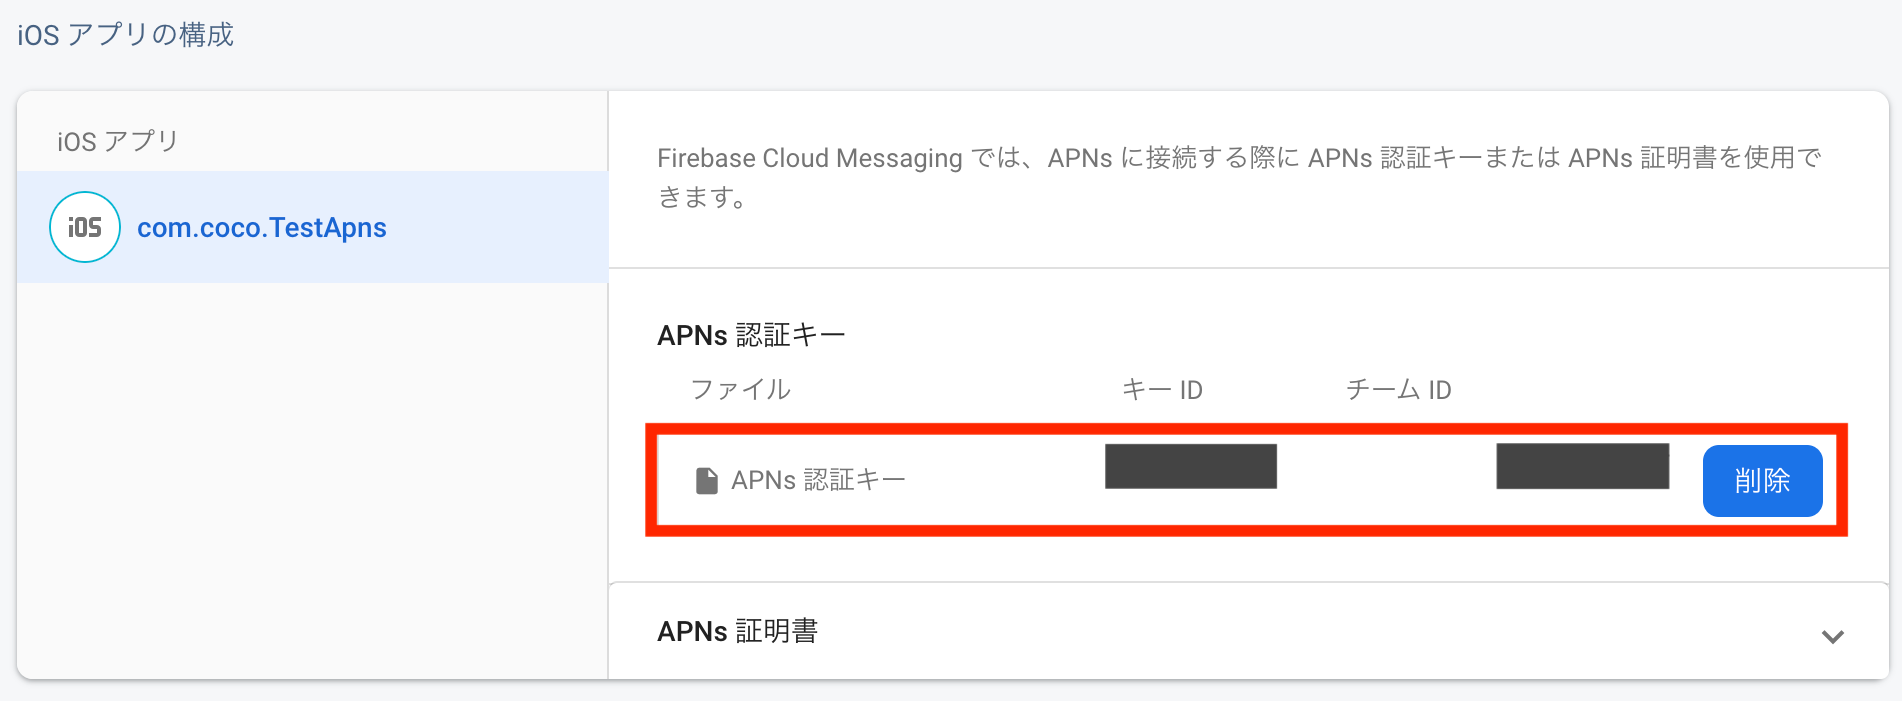
3-8. APNs認証キーファイルをFirebase consoleにアップロードする
①Firebase Consoleにて歯車マークを押下する。
②APNs認証キー欄のアップロードボタンを押下。
③APNs認証キーを選択、キーID・チームIDを入力し、アップロードボタンを押下。
APNs認証キーがアップロードされました。
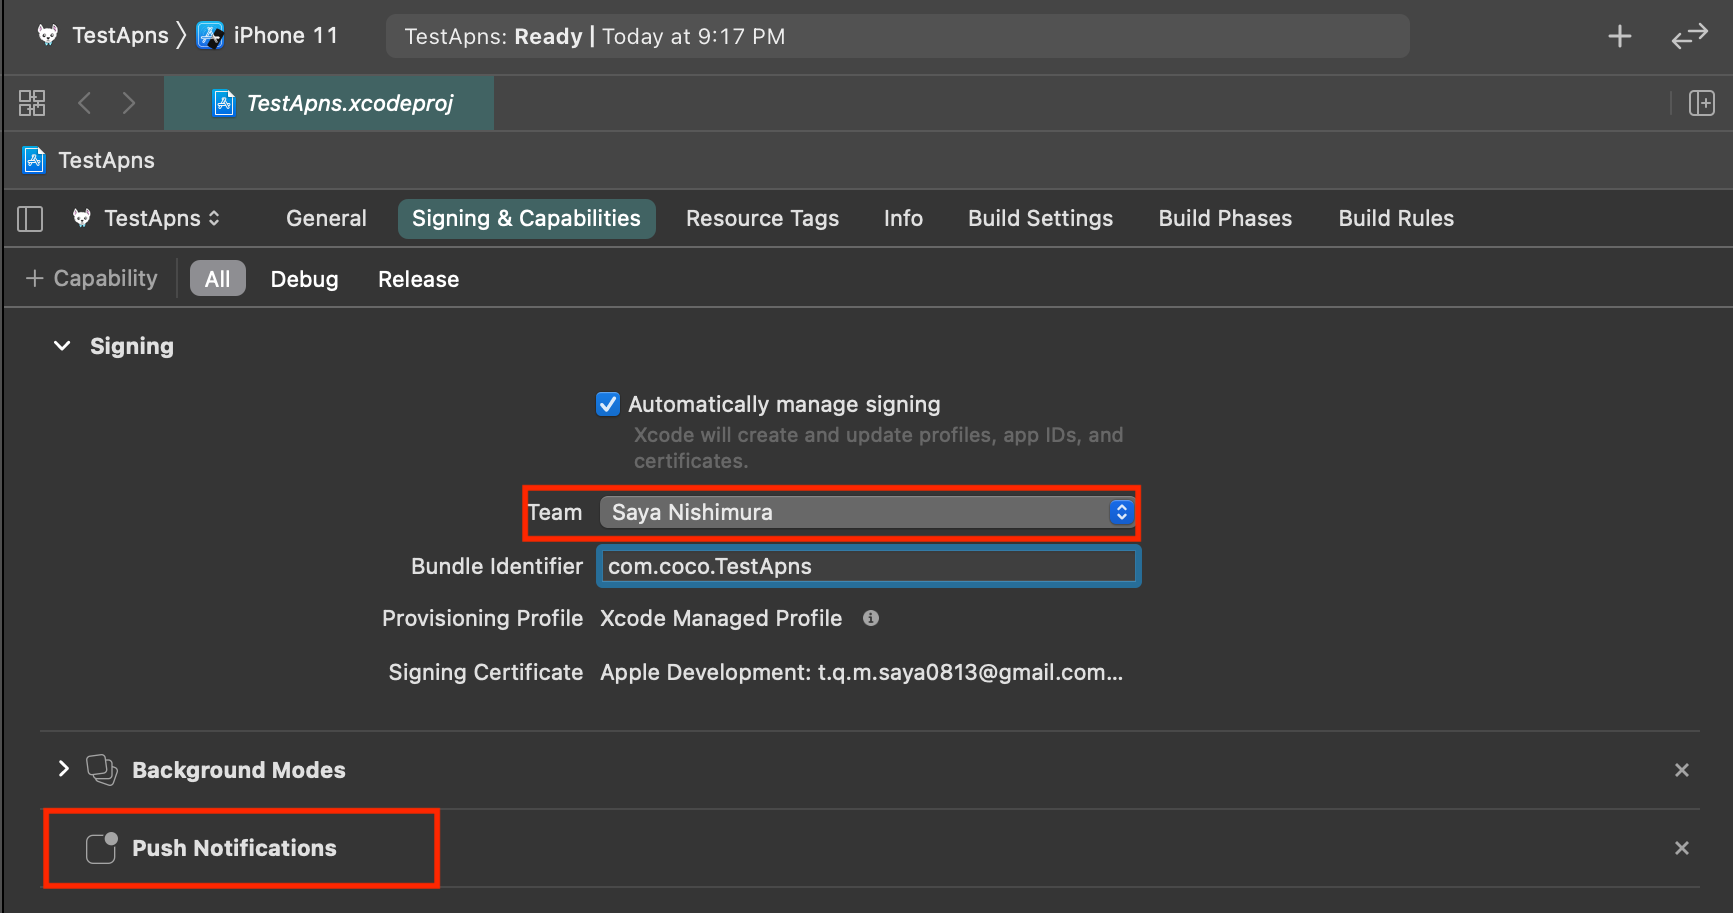
3-9. Push通知を有効にする
XcodeでCapabilityからPush Notificationを有効にする。
TeamにApple Developerアカウントを設定する。前述したように通知を有効にするにはApple Developer Programに登録している必要があります。
4. 実装
今回はとりあえず簡単な通知の受信処理を実装したいだけなので、【Firebase公式ページ】に載っているコードをペタペタ貼っていきます!
アプリの起動時に処理をしたいのと、UIApplicationDelegateのコールバックが必要になるため、全てAppDelegate.swift内に記載していきます。
また、FCMはデフォルトでUserNotificationsのメソッド入れ替え(※)を行う仕様となっています。
※ Method Swizzlingと呼ばれるプログラミングの手法で、既存のメソッドの実装を入れ替える、ということです。今回で言うと、UserNotificatioinsの一部のクラスの実装を入れ替えます。
以下、firebase公式ページより引用。
FCM SDK は、FCM 登録トークンに対する APNs トークンのマッピングと、ダウンストリーム メッセージのコールバック処理中のアナリティクス データの取得という 2 つの主要領域で、メソッドの実装入れ替えを行います。
今回はデフォルトのまま(実装入れ替えあり)で実装します。
(plistの中を変更して、メソッド入れ替えをOFFにすることも可能。)
実装の流れとしては、以下の通りです。
①Firebaseを初期化する。
②メッセージングデリゲートを設定する。
③アプリ起動時に、ユーザーに通知許可を要求し許可されれば、APNsにデバイスを登録する。
④③で登録したデバイストークンを取得する。
⑤トークン更新をモニタリングする。
⑥アラート通知を処理する。
⑦サイレントプッシュ通知を処理する。
最終的なswiftによるソースコードは以下の通りです。
//
// FCMを使ってAPNs通知してみる
//

import UIKit
import UserNotifications

// Firebaseモジュールをインポート
import Firebase

@UIApplicationMain
class AppDelegate: UIResponder, UIApplicationDelegate {

  var window: UIWindow?
  let gcmMessageIDKey = "gcm.message_id"

  func application(_ application: UIApplication,
                   didFinishLaunchingWithOptions launchOptions: [UIApplication.LaunchOptionsKey: Any]?) -> Bool {

    // FirebaseApp 共有インスタンスを構成する
    FirebaseApp.configure()

    // メッセージングデリゲートを設定する
    Messaging.messaging().delegate = self

    if #available(iOS 10.0, *) {
    // iOS 10用
      UNUserNotificationCenter.current().delegate = self

      let authOptions: UNAuthorizationOptions = [.alert, .badge, .sound]
      // ユーザーに通知の許可を求める
      UNUserNotificationCenter.current().requestAuthorization(
        options: authOptions,
        completionHandler: {_,_ in })

    } else {
      let settings: UIUserNotificationSettings =
      UIUserNotificationSettings(types: [.alert, .badge, .sound], categories: nil)
      application.registerUserNotificationSettings(settings)
    }
    // ユーザーにて通知が許可された場合、リモート通知にアプリを登録する。
    application.registerForRemoteNotifications()

    return true
  }

  func application(_ application: UIApplication, didReceiveRemoteNotification userInfo: [AnyHashable: Any]) {
    // If you are receiving a notification message while your app is in the background,
    // this callback will not be fired till the user taps on the notification launching the application.
    // TODO: Handle data of notification
    // With swizzling disabled you must let Messaging know about the message, for Analytics
    // Messaging.messaging().appDidReceiveMessage(userInfo)
    // Print message ID.
    if let messageID = userInfo[gcmMessageIDKey] {
      print("Message ID: \(messageID)")
    }

    // Print full message.
    print(userInfo)
  }

  // サイレントプッシュ通知を処理する
  func application(_ application: UIApplication, didReceiveRemoteNotification userInfo: [AnyHashable: Any],
                   fetchCompletionHandler completionHandler: @escaping (UIBackgroundFetchResult) -> Void) {
    // If you are receiving a notification message while your app is in the background,
    // this callback will not be fired till the user taps on the notification launching the application.
    // TODO: Handle data of notification
    // メソッド入れ替えをしない場合、通知の受信情報をアナリティクスに渡す必要があります。
    // Messaging.messaging().appDidReceiveMessage(userInfo)
    // Print message ID.
    if let messageID = userInfo[gcmMessageIDKey] {
      print("Message ID: \(messageID)")
    }

    // Print full message.
    print(userInfo)

    completionHandler(UIBackgroundFetchResult.newData)
  }

  //
  func application(_ application: UIApplication, didFailToRegisterForRemoteNotificationsWithError error: Error) {
    print("Unable to register for remote notifications: \(error.localizedDescription)")
  }

  // APNsより登録デバイストークンを取得し、コンソールに出力する(デバッグ用)
  func application(_ application: UIApplication, didRegisterForRemoteNotificationsWithDeviceToken deviceToken: Data) {
    print("APNs token retrieved: \(deviceToken)")

    // メソッド実装入れ替えをしない場合、APNs発行のデバイストークンとFCM発行デバイストークンを明示的にマッピングする必要があります。
    // Messaging.messaging().apnsToken = deviceToken
  }
}

// アラート通知を処理する
@available(iOS 10, *)
extension AppDelegate : UNUserNotificationCenterDelegate {

  // Receive displayed notifications for iOS 10 devices.
  func userNotificationCenter(_ center: UNUserNotificationCenter,
                              willPresent notification: UNNotification,
    withCompletionHandler completionHandler: @escaping (UNNotificationPresentationOptions) -> Void) {
    let userInfo = notification.request.content.userInfo

    // With swizzling disabled you must let Messaging know about the message, for Analytics
    // Messaging.messaging().appDidReceiveMessage(userInfo)
    // [START_EXCLUDE]
    // Print message ID.
    if let messageID = userInfo[gcmMessageIDKey] {
      print("Message ID: \(messageID)")
    }
    // [END_EXCLUDE]
    // Print full message.
    print(userInfo)

    // Change this to your preferred presentation option
    completionHandler([[.alert, .sound]])
  }

  func userNotificationCenter(_ center: UNUserNotificationCenter,
                              didReceive response: UNNotificationResponse,
                              withCompletionHandler completionHandler: @escaping () -> Void) {
    let userInfo = response.notification.request.content.userInfo

    // [START_EXCLUDE]
    // Print message ID.
    if let messageID = userInfo[gcmMessageIDKey] {
      print("Message ID: \(messageID)")
    }
    // [END_EXCLUDE]
    // With swizzling disabled you must let Messaging know about the message, for Analytics
    // Messaging.messaging().appDidReceiveMessage(userInfo)
    // Print full message.
    print(userInfo)

    completionHandler()
  }
}

extension AppDelegate : MessagingDelegate {
  // トークン更新のモニタリング
  func messaging(_ messaging: Messaging, didReceiveRegistrationToken fcmToken: String?) {
    // コンソールに登録トークンを出力する
    print("Firebase registration token: \(String(describing: fcmToken))")

    // 登録トークンが新規の場合、アプリケーションサーバーに送信
    let dataDict:[String: String] = ["token": fcmToken ?? ""]
    NotificationCenter.default.post(name: Notification.Name("FCMToken"), object: nil, userInfo: dataDict)
  }

}
実装する際は下記コマンドでXcodeのプロジェクトを開いて作業して下さい。
(そうでないと、折角「3.事前準備」でインストールしたSDKを使用する事が出来ない為ご注意下さい。)
$ open TestApns.xcworkspace
それでは、一つ一つ見ていきましょう。
4-1. Firebase を初期化する
まずFirebaseモジュールを UIApplicationDelegate にインポートします。
UserNotificationsも必要なので、インポートして下さい。
import UserNotifications
import Firebase
FirebaseApp 共有インスタンスを構成します。
通常はアプリ application:didFinishLaunchingWithOptions: メソッドで行います。
FirebaseApp.configure()
4-2. メッセージング デリゲートを設定する
Messaging.messaging().delegate = self
※デリゲートとは、デザインパターンの一種で、あるクラスから他のクラスに処理を任せることを指します。
4-3.アプリ起動時に、ユーザーに通知許可を要求し許可されれば、APNsにデバイスを登録する
今回は起動時に登録することにします。
この時に、APNsトークンとFCM登録トークンをマッピングしています。
if #available(iOS 10.0, *) {
  // For iOS 10 display notification (sent via APNS)
  UNUserNotificationCenter.current().delegate = self

  let authOptions: UNAuthorizationOptions = [.alert, .badge, .sound]
  UNUserNotificationCenter.current().requestAuthorization(
    options: authOptions,
    completionHandler: {_,_ in })
} else {
  let settings: UIUserNotificationSettings =
  UIUserNotificationSettings(types: [.alert, .badge, .sound], categories: nil)
  application.registerUserNotificationSettings(settings)
}

application.registerForRemoteNotifications()
4-4. 登録したデバイストークンを取得する
デバッグ用に、登録したデバイストークンをコンソールに出力する関数を用意します。
ここで出力されるデバイストークンは、後ほど通知のテストをする際に必要になるので、
忘れない様に控えて下さい。
func application(_ application: UIApplication, didRegisterForRemoteNotificationsWithDeviceToken deviceToken: Data) {
  print("APNs token retrieved: \(deviceToken)")

  // メソッド実装入れ替えをしない場合、APNs発行のデバイストークンとFCM発行デバイストークンを明示的にマッピングする必要があります。
  // Messaging.messaging().apnsToken = deviceToken
}
4-5. デバイストークン更新をモニタリングする
デバイストークンが更新されても通知を受信し続けるには、デバイストークンをモニタリングし、更新される都度、最新のデバイストークンをリモート通知に登録する必要があります。
デバイストークンは次のような場合に変更されることがあります。
- アプリが新しいデバイスで復元される場合
- ユーザーがアプリをアンインストール / 再インストールする場合
- ユーザーがアプリのデータを消去する場合
func messaging(_ messaging: Messaging, didReceiveRegistrationToken fcmToken: String?) {
  print("Firebase registration token: \(String(describing: fcmToken))")

  let dataDict:[String: String] = ["token": fcmToken ?? ""]
  NotificationCenter.default.post(name: Notification.Name("FCMToken"), object: nil, userInfo: dataDict)
  // TODO: If necessary send token to application server.
  // Note: This callback is fired at each app startup and whenever a new token is generated.
}
4-6. アラート通知を処理する
@available(iOS 10, *)
extension AppDelegate : UNUserNotificationCenterDelegate {

  // Receive displayed notifications for iOS 10 devices.
  func userNotificationCenter(_ center: UNUserNotificationCenter,
                              willPresent notification: UNNotification,
    withCompletionHandler completionHandler: @escaping (UNNotificationPresentationOptions) -> Void) {
    let userInfo = notification.request.content.userInfo

    // With swizzling disabled you must let Messaging know about the message, for Analytics
    // Messaging.messaging().appDidReceiveMessage(userInfo)

    // ...

    // Print full message.
    print(userInfo)

    // Change this to your preferred presentation option
    completionHandler([[.alert, .sound]])
  }

  func userNotificationCenter(_ center: UNUserNotificationCenter,
                              didReceive response: UNNotificationResponse,
                              withCompletionHandler completionHandler: @escaping () -> Void) {
    let userInfo = response.notification.request.content.userInfo

    // ...

    // With swizzling disabled you must let Messaging know about the message, for Analytics
    // Messaging.messaging().appDidReceiveMessage(userInfo)

    // Print full message.
    print(userInfo)

    completionHandler()
  }
}
4-7. サイレントプッシュ通知を処理する
サイレントプッシュ通知の処理は、アラート通知とは別に実装する必要があります。
func application(_ application: UIApplication, didReceiveRemoteNotification userInfo: [AnyHashable: Any],
                 fetchCompletionHandler completionHandler: @escaping (UIBackgroundFetchResult) -> Void) {
  // If you are receiving a notification message while your app is in the background,
  // this callback will not be fired till the user taps on the notification launching the application.
  // TODO: Handle data of notification

  // With swizzling disabled you must let Messaging know about the message, for Analytics
  // Messaging.messaging().appDidReceiveMessage(userInfo)

  // Print message ID.
  if let messageID = userInfo[gcmMessageIDKey] {
    print("Message ID: \(messageID)")
  }

  // Print full message.
  print(userInfo)

  completionHandler(UIBackgroundFetchResult.newData)
}
5. 通知してみる
5-1. Xcodeでアプリを実行する
実機をPCに接続し、Xcodeにてデバック対象に実機を選択・アプリを実行します。
ログにデバイストークンが出力されるので、控えて下さい。

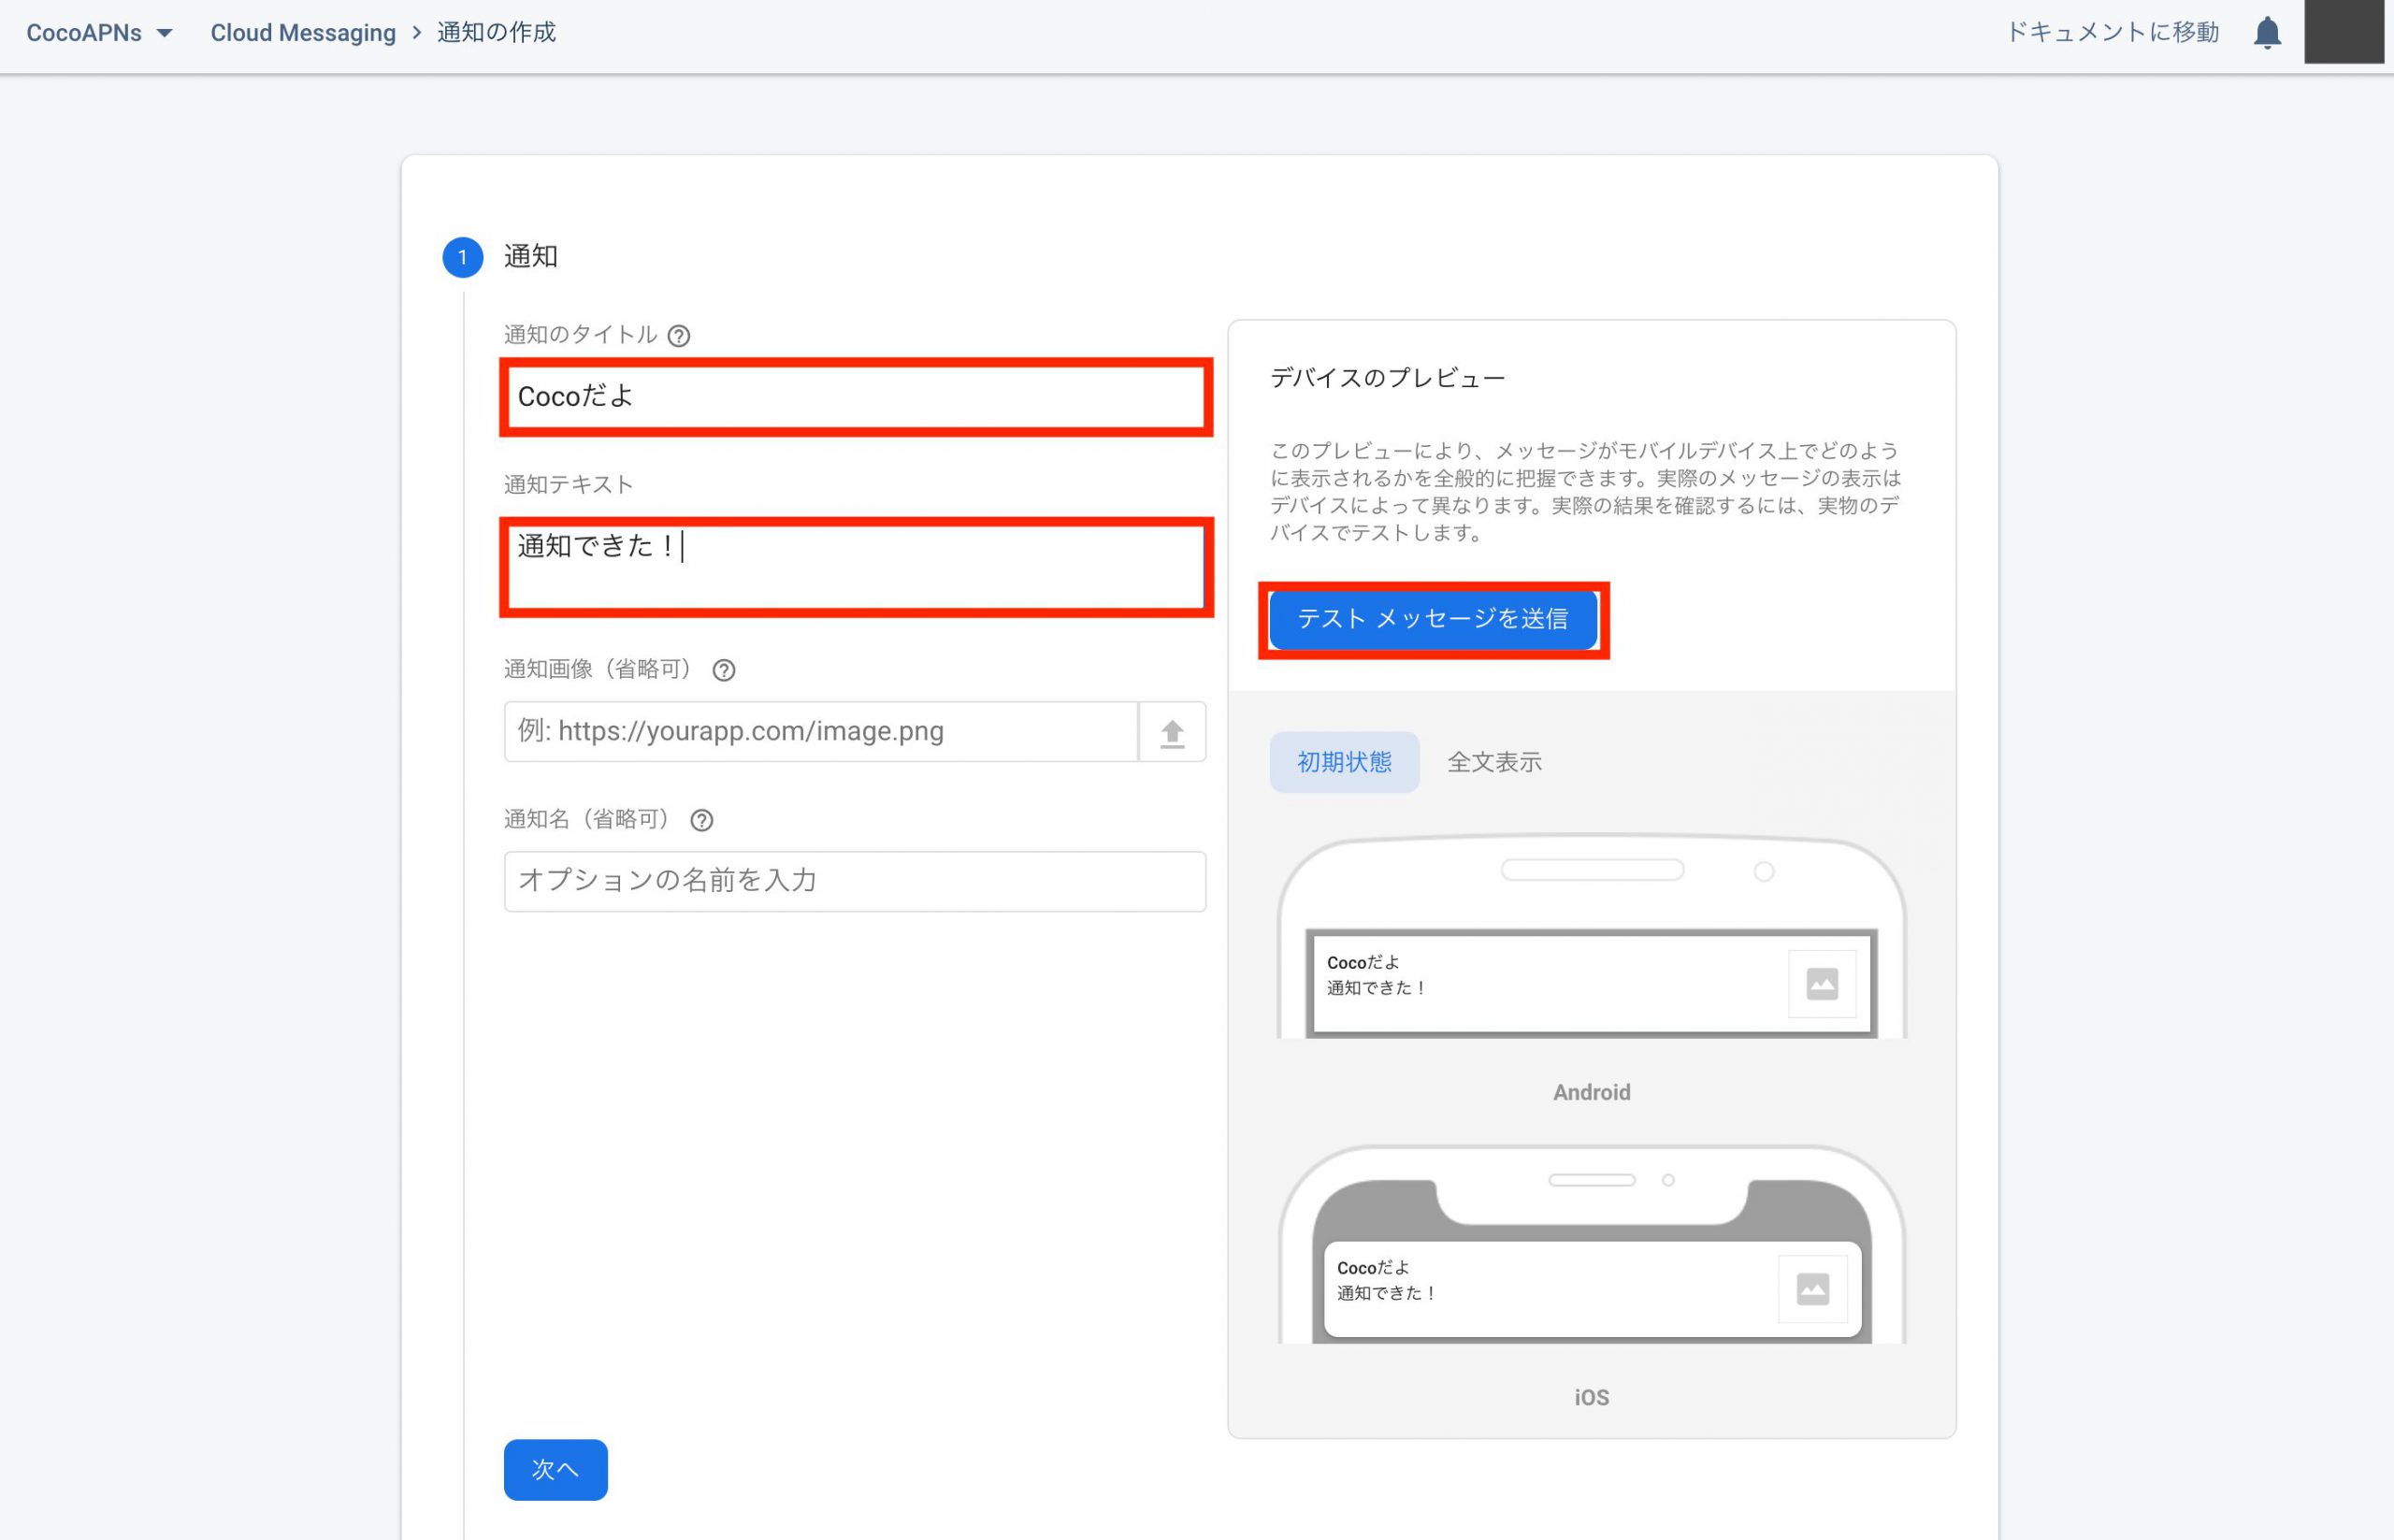
5-2. 通知メッセージを送信する
Firebase Consoleにて、通知のタイトル、通知テキストを設定し、「テストメッセージを送信」ボタンを押下する。
テストメッセージを送信するのに「次へ」ボタン以降の操作は不要です。
控えておいたデバイストークンを設定し、「テスト」ボタンを押下する。
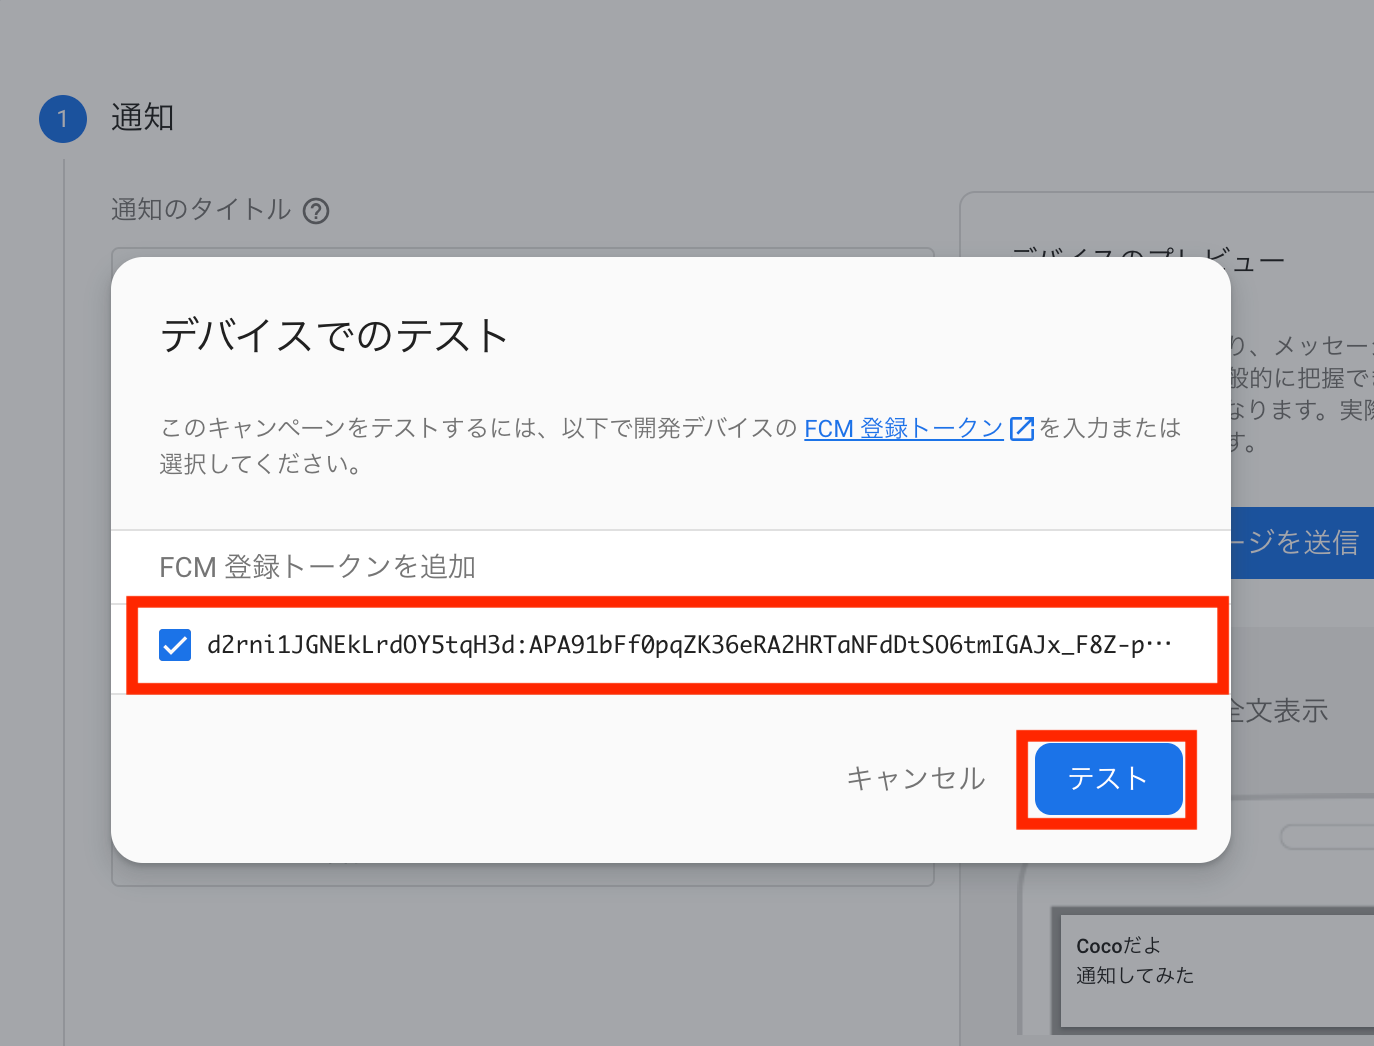
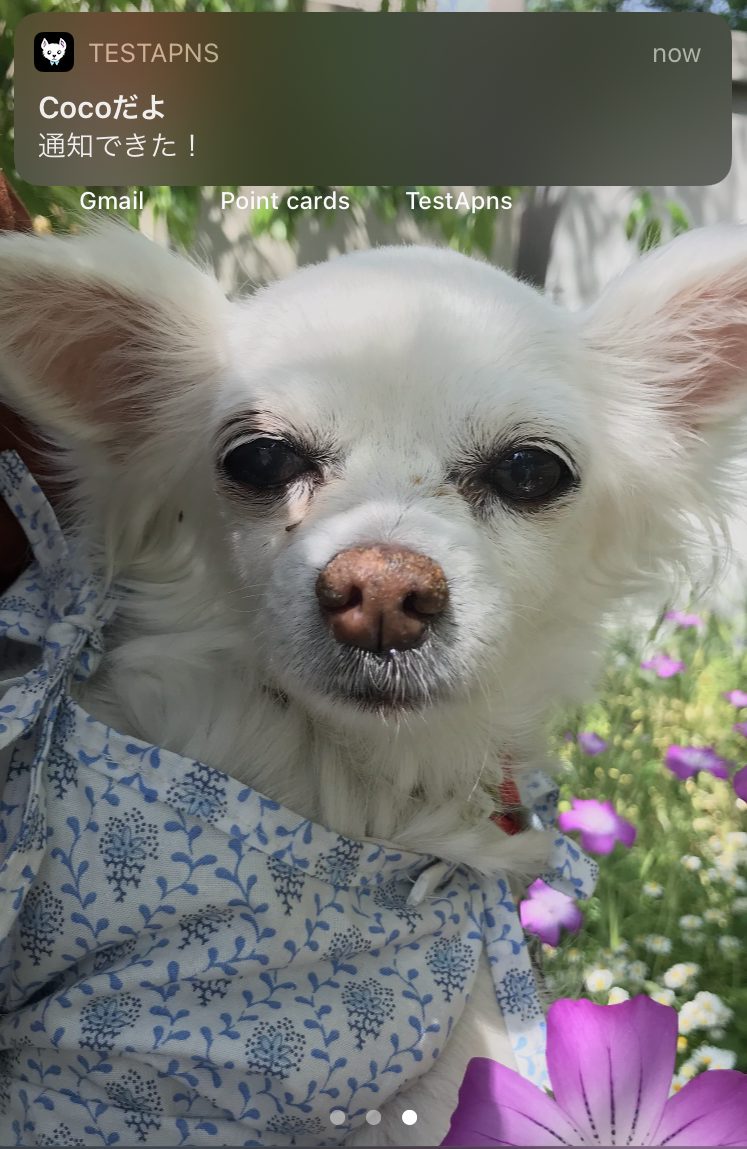
実機を確認します。通知できましたね!
通知が届かない場合、「3-8. APNs認証キーファイルをFirebase consoleにアップロードする」にて設定したキーIDチームIDが合っているか確認してみて下さい。
私はこれで少し躓きました。。
6. まとめ
いかがでしたでしょうか。
FCMを使うと、受信側の実装だけで簡単に通知の検証ができて便利ですね!
今回はFirbaseのGUIから通知メッセージの送信をしましたが、次回は通知メッセージを送信するバックエンドの実装もしてみたいと思います。